Quantcast
Channel: Category Name
Viewing all 5264 articles
Browse latest View live

What’s new in Azure DevOps Sprint 156

$
0
0

Sprint 156 has just finished rolling out to all organizations and you can check out all the new features in the release notes. Here are some of the features that you can start using today.

Comments in Wiki pages 

Previously, you didn’t have a way to interact with others inside wiki. This made collaborating over content and getting questions answered a challenge since conversations had to happen over mail or chat channels. With comments, you can now collaborate with others within wiki. You can leverage the @mention users functionality inside comments to draw the attention of other team members. 

Azure Boards new features

Azure Boards introduced new collaboration features, some of which are listed below:

Customize system picklist values

You can now customize the values for any system picklist (except the reason field) such as Severity, Activity, Priority, etc. The picklist customizations are scoped so that you can manage different values for the same field for each work item type.

Mention people, work items and PRs in text fields

We heard that you wanted the ability to mention people, work items, and PRs in the work item description area (and other HTML fields) on the work item and not just in comments. Sometimes you are collaborating with someone on a work item, or want to highlight a PR in your work item description, but didn’t have a way to add that information. Now you can mention people, work items, and PRs in all long text fields on the work item.

Reactions on discussion comments

You can now add reactions to any comment, and there are two ways to add your reactions – the smiley icon at the top right corner of any comment, as well as at the bottom of a comment next to any existing reactions. You can add all six reactions if you like, or just one or two!

These are just the tip of the iceberg, and there are plenty more features that we’ve released in Sprint 156. Check out the full list of features for this sprint in the release notes.

The post What’s new in Azure DevOps Sprint 156 appeared first on Azure DevOps Blog.


Announcing the Azure Repos app for Slack

$
0
0

Managing codebase is a team effort. It requires great deal of discipline and coordination among developers to have clean, ship-ready master. This involves frequent communication between a developer who writes the code and people who review the same. Slack is one of the most popular communication platforms where developers across the hierarchy collaborate to build and ship products.

Today, we are excited to announce the availability of Azure Repos app for Slack which helps users to monitor their code repositories.

Users can set up and manage subscriptions to get notifications in their channel whenever code is pushed/checked in, pull requests (PRs) are created, updated and more. Users can leverage the presence of subscription filters to customize what they hear in the channel. Additionally, previews for pull request URLs help users to initiate discussions around PRs and keep the conversations contextual and accurate.

Get notified when code is pushed to a Git repository

Know when pull requests are raised

Monitor changes to your pull request

Use pull request URLs to initiate discussions around PRs

Get notified when code is checked into a TFVC repository

For more details about the app, please take a look at the documentation or go straight ahead and install the app.

We’re constantly at work to improve the app, and soon you’ll see new features coming along, including the ability to create bulk subscriptions for all the repositories in a project. Please give the app a try and send us your feedback using the /azrepos feedback command in the app or on Developer Community.

The post Announcing the Azure Repos app for Slack appeared first on Azure DevOps Blog.

Azure Security Center single click remediation and Azure Firewall JIT support

$
0
0

This blog post was co-authored by Rotem Lurie, Program Manager, Azure Security Center.​

Azure Security Center provides you with a bird’s eye security posture view across your Azure environment, enabling you to continuously monitor and improve your security posture using secure score in Azure. Security Center helps you identify and perform the hardening tasks recommended as security best practices and implement them across your machines, data services, and apps. This includes managing and enforcing your security policies and making sure your Azure Virtual Machines, non-Azure servers, and Azure PaaS services are compliant.

Today, we are announcing two new capabilities—the preview for remediating recommendations on a bulk of resources in a single click using secure score and the general availability (GA) of just-in-time (JIT) virtual machine (VM) access for Azure Firewall. Now you can secure your Azure Firewall protected environments with JIT, in addition to your network security group (NSG) protected environments.

Single click remediation for bulk resources in preview

With so many services offering security benefits, it's often hard to know what steps to take first to secure and harden your workload. Secure score in Azure reviews your security recommendations and prioritizes them for you, so you know which recommendations to perform first. This helps you find the most serious security vulnerabilities so you can prioritize investigation. Secure score is a tool that helps you assess your workload security posture.

In order to simplify remediation of security misconfigurations and to be able to quickly improve your secure score, we are introducing a new capability that allows you to remediate a recommendation on a bulk of resources in a single click.

This operation will allow you to select the resources you want to apply the remediation to and launch a remediation action that will configure the setting on your behalf. Single click remediation is available today for preview customers as part of the Security Center recommendations blade.

You can look for the 1-click fix label next to the recommendation and click on the recommendation:

Recommendations blade in Azure Security Center

Once you choose the resources you want to remediate and select Remediate, the remediation takes place and the resources move to the Healthy resources tab. Remediation actions are logged in the activity log to provide additional details in case of a failure.

Enabling auditing on SQL Server in Azure Security Center

Remediation is available for the following recommendations in preview:

  • Web Apps, Function Apps, and API Apps should only be accessible over HTTPS
  • Remote debugging should be turned off for Function Apps, Web Apps, and API Apps
  • CORS should not allow every resource to access your Function Apps, Web Apps, or API Apps
  • Secure transfer to storage accounts should be enabled
  • Transparent data encryption for Azure SQL Database should be enabled
  • Monitoring agent should be installed on your virtual machines
  • Diagnostic logs in Azure Key Vault and Azure Service Bus should be enabled
  • Diagnostic logs in Service Bus should be enabled
  • Vulnerability assessment should be enabled on your SQL servers
  • Advanced data security should be enabled on your SQL servers
  • Vulnerability assessment should be enabled on your SQL managed instances
  • Advanced data security should be enabled on your SQL managed instances

Single click remediation is part of Azure Security Center’s free tier.

Just-in-time virtual machine access for Azure Firewall is generally available

Announcing the general availability of just-in-time virtual machine access for Azure Firewall. Now you can secure your Azure Firewall protected environments with JIT, in addition to your NSG protected environments.

JIT VM access reduces your VM’s exposure to network volumetric attacks by providing controlled access to VMs only when needed, using your NSG and Azure Firewall rules.

When you enable JIT for your VMs, you create a policy that determines the ports to be protected, how long the ports are to remain open, and approved IP addresses from where these ports can be accessed. This policy helps you stay in control of what users can do when they request access.

Requests are logged in the activity log, so you can easily monitor and audit access. The JIT blade also helps you quickly identify existing virtual machines that have JIT enabled and virtual machines where JIT is recommended.

Azure Security Center displays your recently approved requests. The Configured VMs tab reflects the last user, the time, and the open ports for the previous approved JIT requests. When a user creates a JIT request for a VM protected by Azure Firewall, Security Center provides the user with the proper connection details to your virtual machine, translated directly from your Azure Firewall destination network address translation (DNAT).

Configured virtual machines in Azure Security Center

This feature is available in the Standard pricing tier of Security Center, which you can try for free for the first 60 days.

To learn more about these features in Security Center, visit “Remediate recommendations in Azure Security Center,” just-in-time VM access documentation, and Azure Firewall documentation. To learn more about Azure Security Center, please visit the Azure Security Center home page.

Azure Sphere’s customized Linux-based OS

$
0
0

Security and resource constraints are often at odds with each other. While some security measures involve making code smaller by removing attack surfaces, others require adding new features, which consume precious flash and RAM. How did Microsoft manage to create a secure Linux based OS that runs on the Azure Sphere MCU?

The Azure Sphere OS begins with a long-term support (LTS) Linux kernel. Then the Azure Sphere development team customizes the kernel to add additional security features, as well as some code targeted at slimming down resource utilization to fit within the limited resources available on an Azure Sphere chip. In addition, applications, including basic OS services, run isolated for security. Each application must opt in to use the peripherals or network resources it requires. The result is an OS purpose-built for Internet of Things (IoT) and security, which creates a trustworthy platform for IoT experiences.

At the 2018 Linux Security Summit, Ryan Fairfax, an Azure Sphere engineering lead, presented a deep dive into the Azure Sphere OS and the process of fitting Linux security in 4 MiB of RAM. In this talk, Ryan covers the security components of the system, including a custom Linux Security Module, modifications and extensions to existing kernel components, and user space components that form the security backbone of the OS. He also discusses the challenges of taking modern security techniques and fitting them in resource-constrained devices. I hope that you enjoy this presentation!

Watch the video to learn more about the development of Azure Sphere’s secure, Linux-based OS. You can also look forward to Ryan’s upcoming talk on Using Yocto to Build an IoT OS Targeting a Crossover SoC at the Embedded Linux Conference in San Diego on August 22.

Visit our website for documentation and more information on how to get started with Azure Sphere.


The PowerShell you know and love now with a side of Visual Studio

$
0
0

While we know that many of you enjoy, and rely on the Visual Studio Command Prompt, some of you told us that you would prefer to have a PowerShell version of the tool. We are happy to share that in Visual Studio 2019 version 16.2, we added a new Developer PowerShell!

Using the new Developer PowerShell

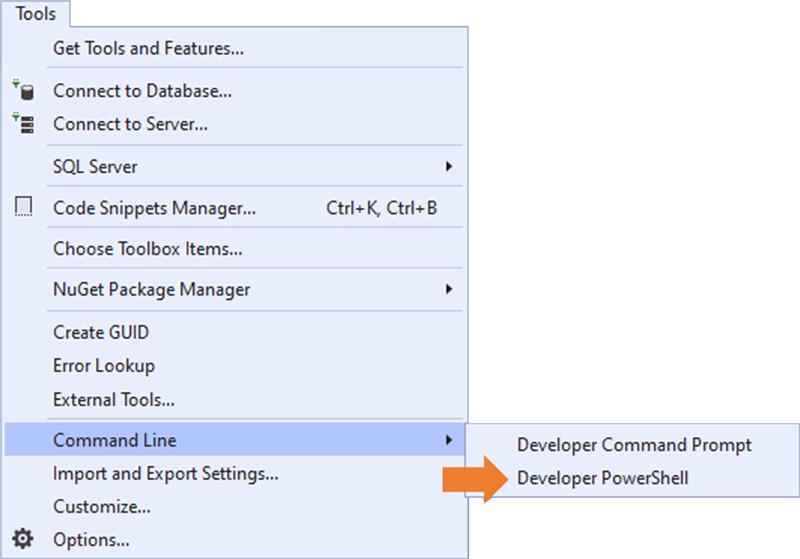
We also added two new menu entries, providing quick access to not just the Developer PowerShell, but also for the Developer Command Prompt. These menu entries are located under Tools > Command Line.

C:UsersruriosAppDataLocalMicrosoftWindowsINetCacheContent.MSO7DF5E1ED.tmp

Also, you can access the Developer Command Prompt and Developer PowerShell via the search (Ctrl +Q):

Selecting either of these tools, will launch them in their respective external windows, and with all the predefined goodness (e.g. preset PATHs and environment variables) you already rely on.

Opening them from Visual Studio automatically adjust their directories based on current solution or folder’s location. Additionally, If no solution or folder is open at the time of invocation, their directories are set based on the “Projects location” setting. This setting is located under Tools > Options > Locations.

Try it out and let us know what you think!

We’d love to know how it fits your workflow. Please reach out if you have any suggestions or comments around how we could further improve the experience. Send us your feedback via the Developer Community portal or via the Help > Send Feedback feature inside Visual Studio.

The post The PowerShell you know and love now with a side of Visual Studio appeared first on The Visual Studio Blog.

Collections is now available to test in the Canary channel

$
0
0

Today, we’re releasing an experimental preview of Collections for Microsoft Edge. We initially demoed this feature during the Microsoft Build 2019 conference keynote. Microsoft Edge Insiders can now try out an early version of Collections by enabling the experimental flag on Microsoft Edge preview builds starting in today’s Canary channel build.

We designed Collections based on what you do on the web. It’s a general-purpose tool that adapts to the many roles that you all fill. If you’re a shopper, it will help you collect and compare items. If you’re an event or trip organizer, Collections will help pull together all your trip or event information as well as ideas to make your event or trip a success. If you’re a teacher or student, it will help you organize your web research and create your lesson plans or reports. Whatever your role, Collections can help.

The current version of Collections is an early preview and will change as we continue to hear from you. For that reason, it’s currently behind an experimental flag and is turned off by default. There may be some bugs, but we want to get this early preview into your hands to hear what you think.

Try out Collections

To try out Collections, you’ll need to be on the Canary Channel which you can download from the Microsoft Edge Insider website.

Once you’re on the right build, you’ll need to manually enable the experiment. In the address bar, enter edge://flags#edge-collections to open the experimental settings page. Click the dropdown and choose Enabled, then select the Restart button from the bottom banner to close all Microsoft Edge windows and relaunch Microsoft Edge.

Screenshot of the "Experimental Collections feature" flag in edge://flags

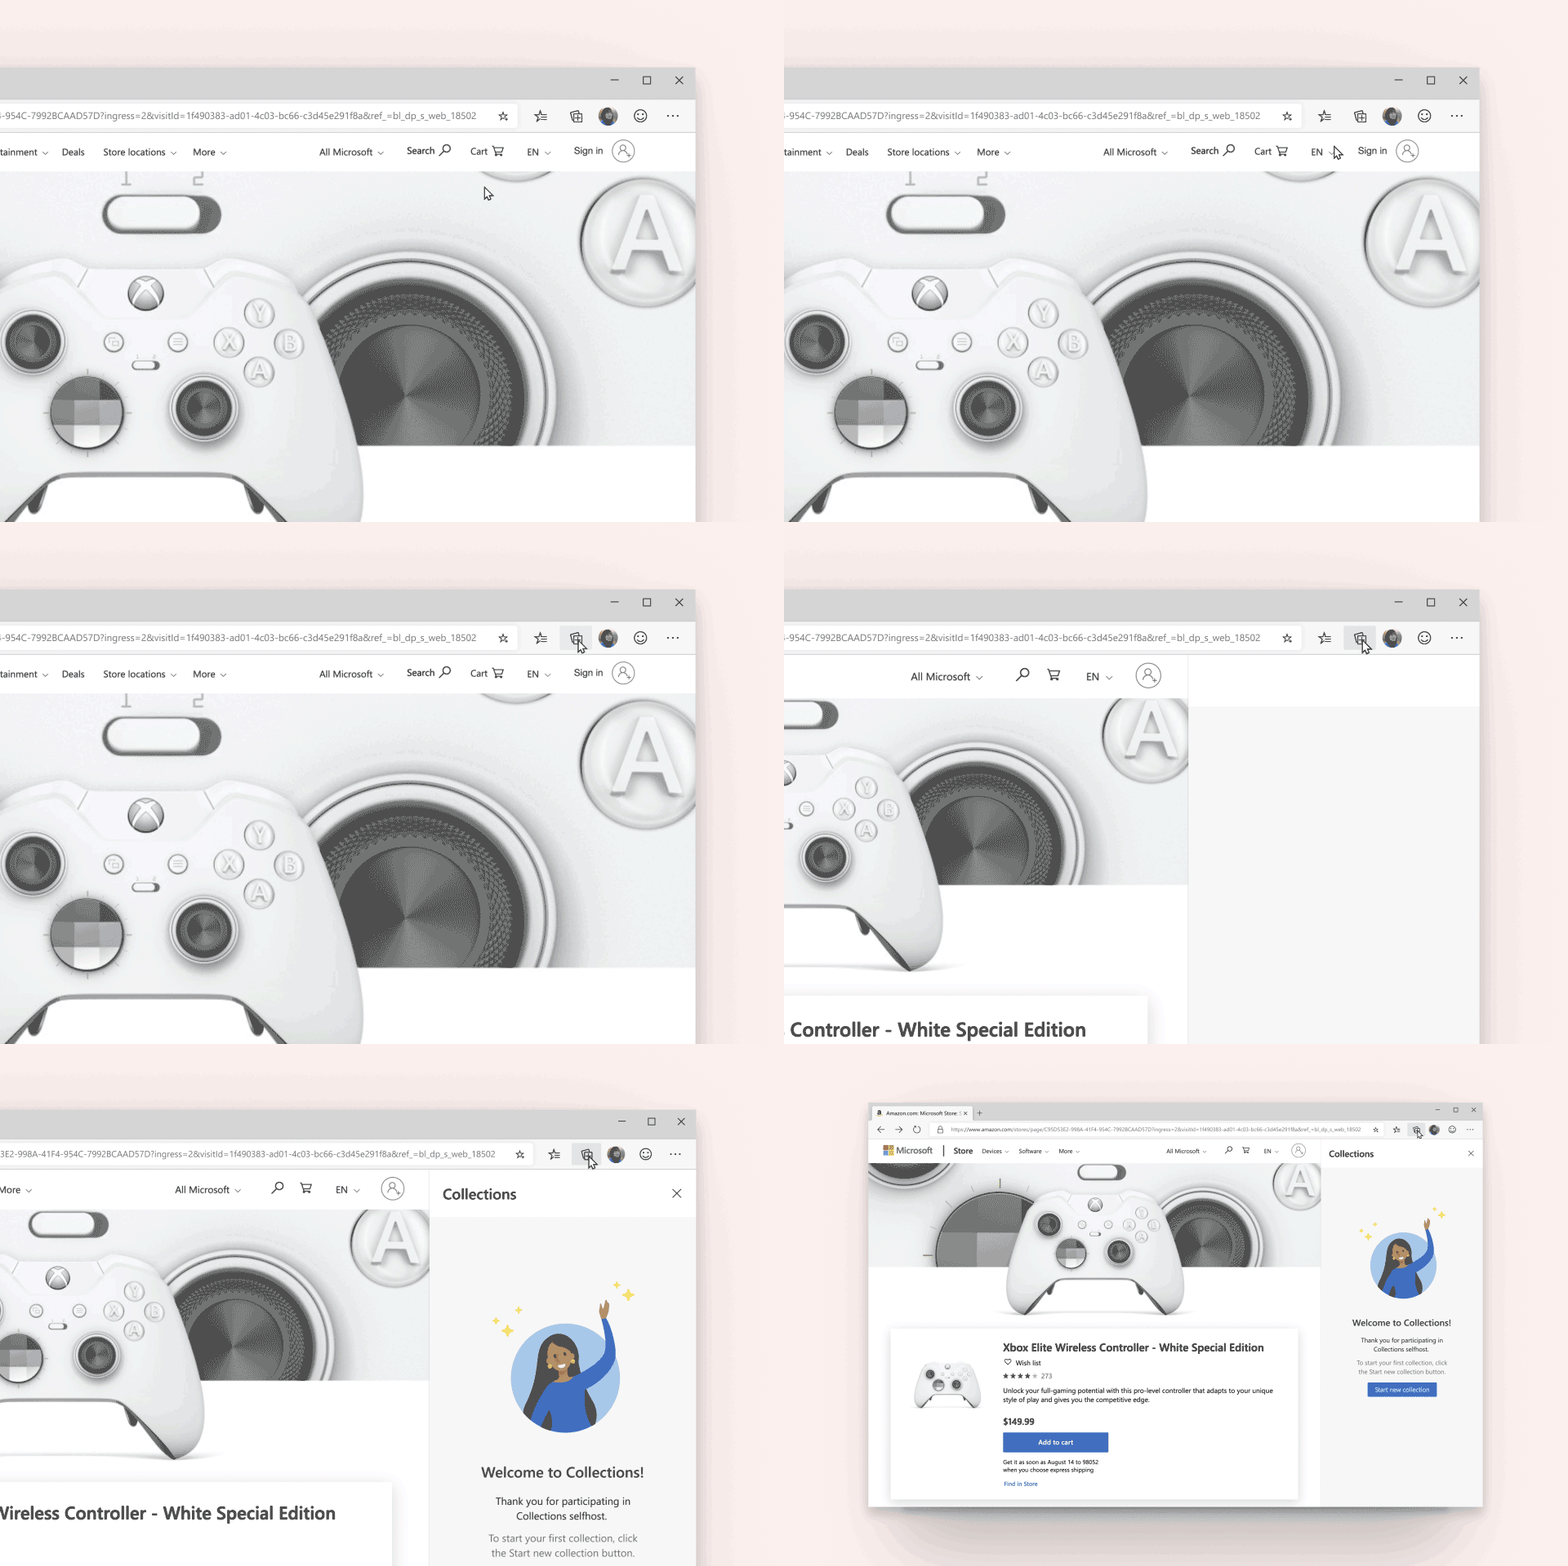
Once the Collections experiment is enabled, you can get started by opening the Collections pane from the button next to the address bar.

Animation of adding a page to a sample collection titled "Amy's wishlist" 

Start a collection

When you open the Collections pane, select Start new collection and give it a name. As you browse, you can start to add content related to your collection in three different ways:

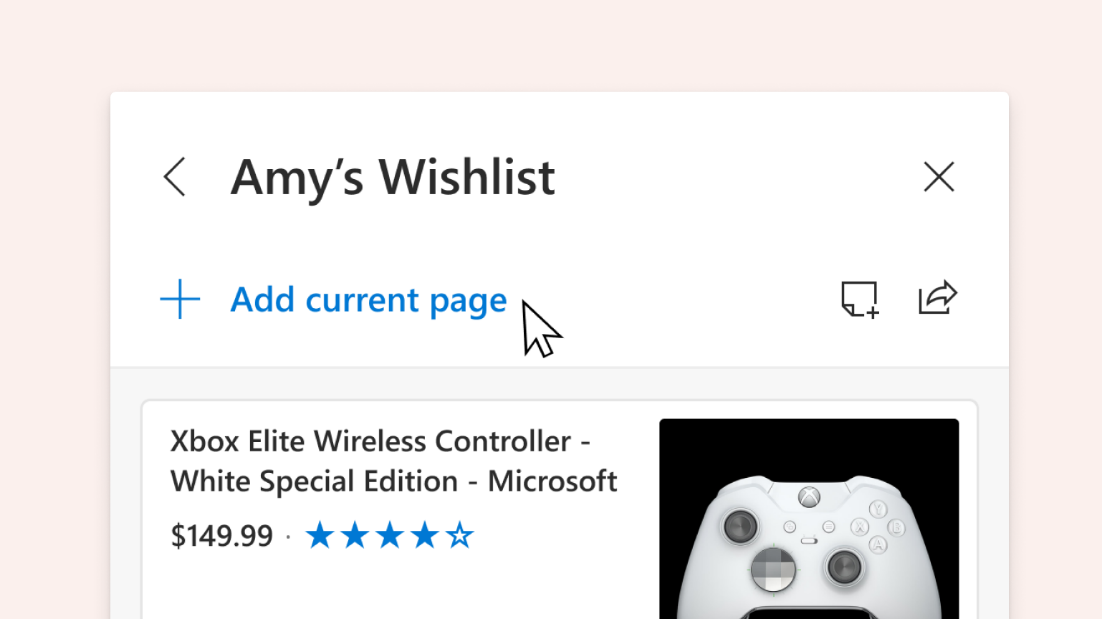
  • Add current page: If you have the Collections pane open, you can easily add a webpage to your collection by selecting Add current page at the top of the pane.

Screenshot of a sample collection titled "Amy's wishlist," with the "Add current page" button highlighted

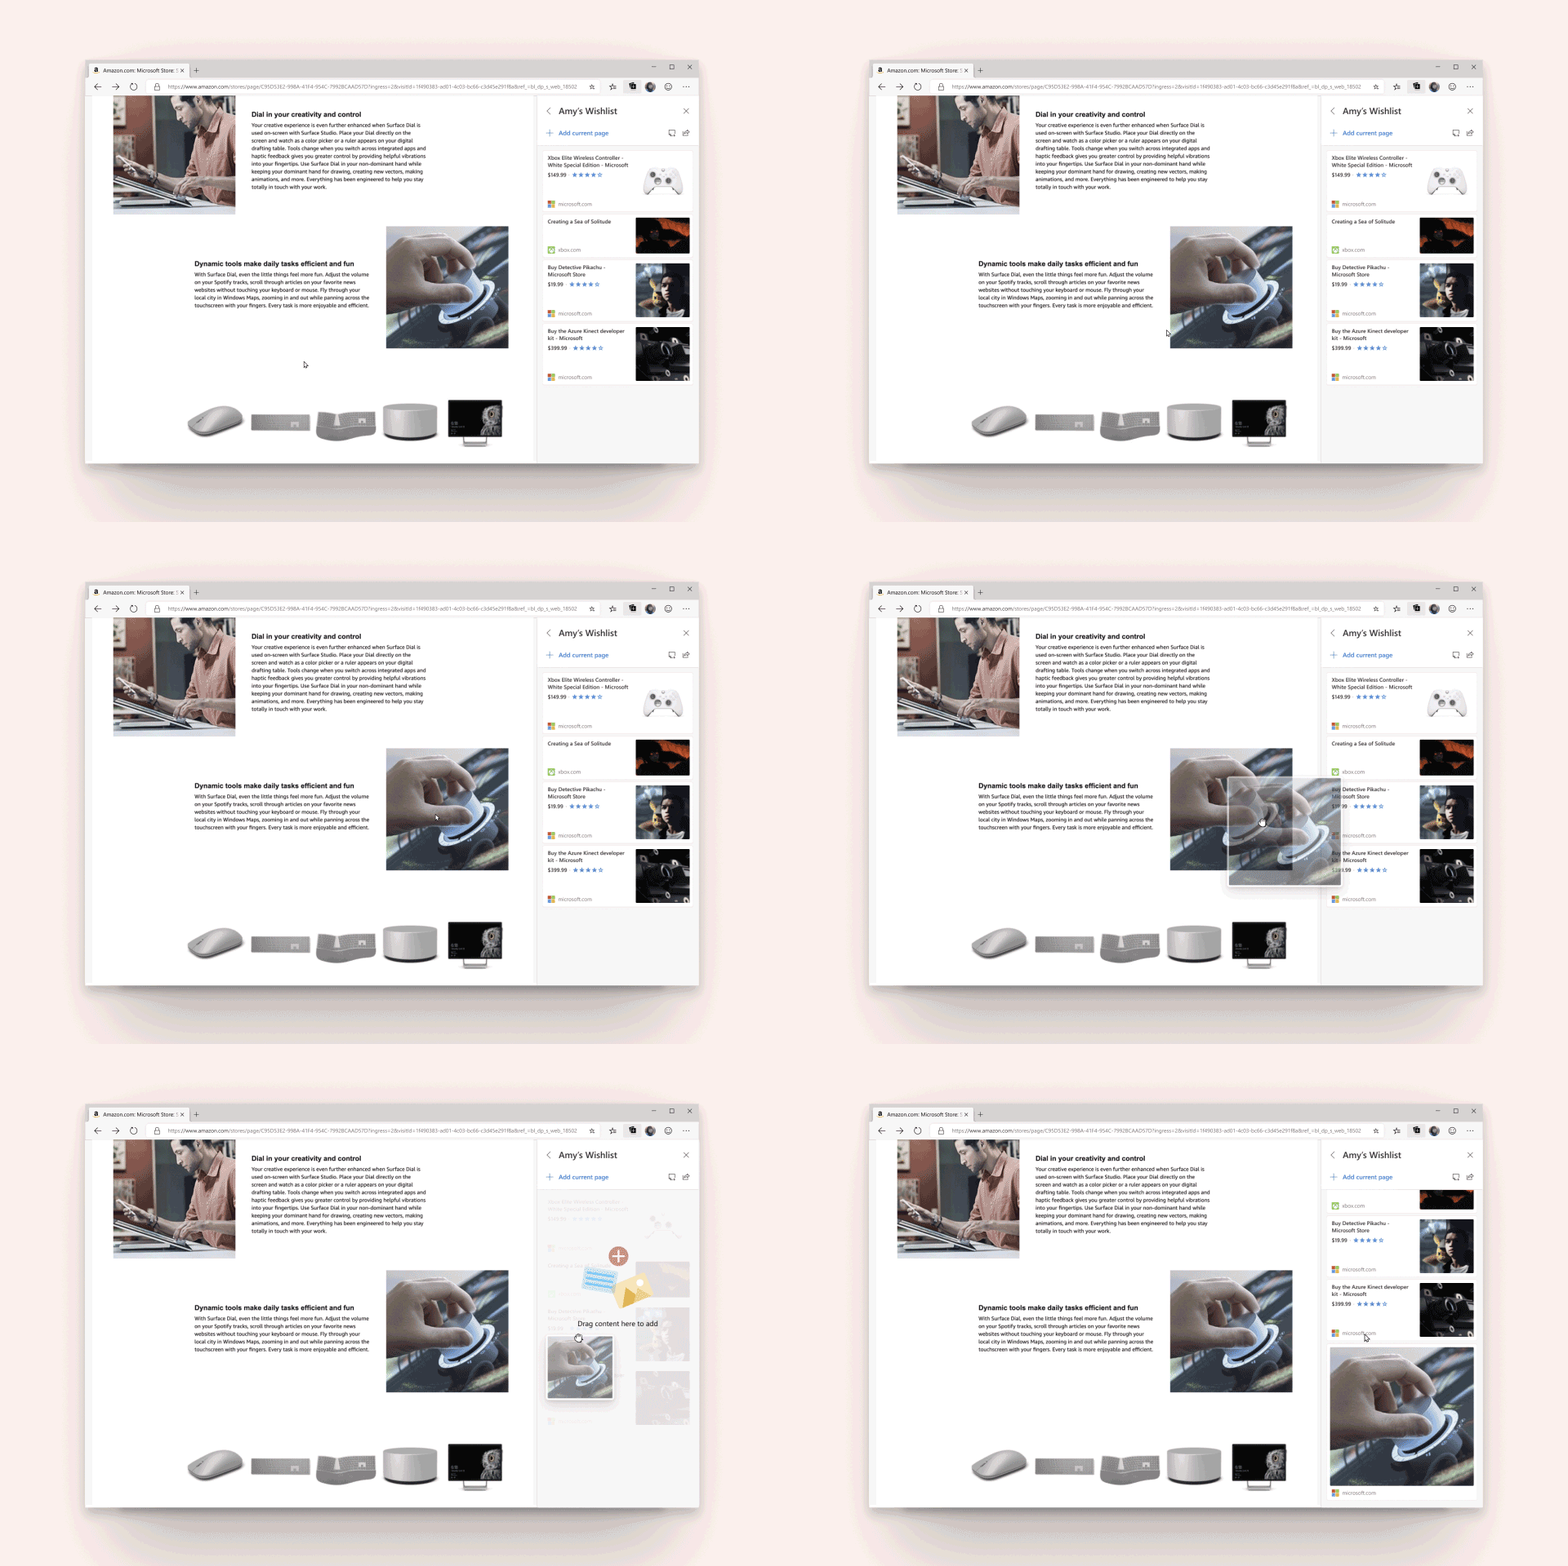
  • Drag/drop: When you have the Collections pane open, you can add specific content from a webpage with drag and drop. Just select the image, text, or hyperlink and drag it into the collection.

Animation showing an image being dragged to the Collections pane

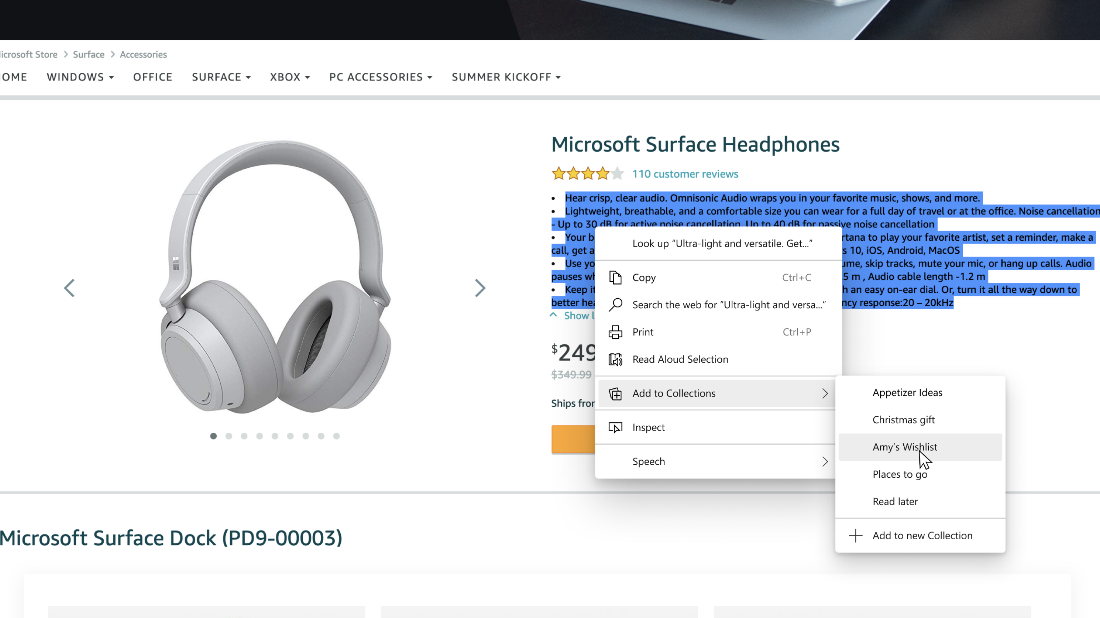
  • Context menu: You can also add content from a webpage from the context menu. Just select the image, text, or hyperlink, right-click it, and select Add to Collections. You can choose an existing collection to add to or start a new one.

Screenshot of the "Add to Collections" entry in the right-click context menu

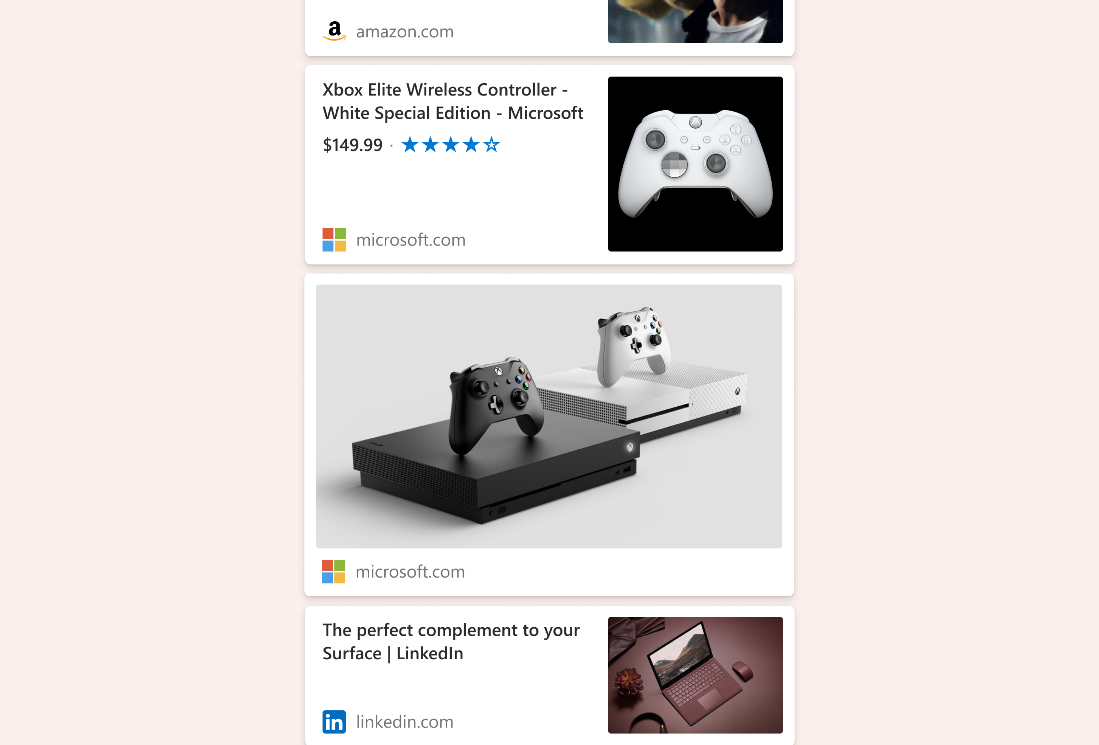
When you add content to Collections, Microsoft Edge creates a visual card to make it easier to recognize and remember the content. For example, a web page added to a collection will include a representative image from that page, the page title, and the website name. You can easily revisit your content by clicking on the visual card in the Collections pane.

Screenshot of cards in the Collections pane

You’ll see different cards for the different types of content you add to Collections. Images added to a collection will be larger and more visual, while full websites added to a collection will show the most relevant content from the page itself. We’re still developing this, starting with a few shopping websites. Content saved to a collection from those sites will provide more detailed information like the product’s price and customer rating.

Edit your collection

  • Add notes: You can add your own notes directly to a collection. Select the add note icon Add note icon from the top of the Collections pane. Within the note, you can create a list and add basic formatting options like bold, italics, or underline.
  • Rearrange: Move your content around in the Collections pane. Just click an item and drag and drop it in the position you prefer.
  • Remove content: To remove content from your collection, hover over the item, select the box that appears in the upper-right corner, and then select the delete icon Trash can icon from the top of the Collections pane.

Export your collection

Once you’ve created a collection, you can easily use that content by exporting it. You can choose to export the whole collection or select a subset of content.

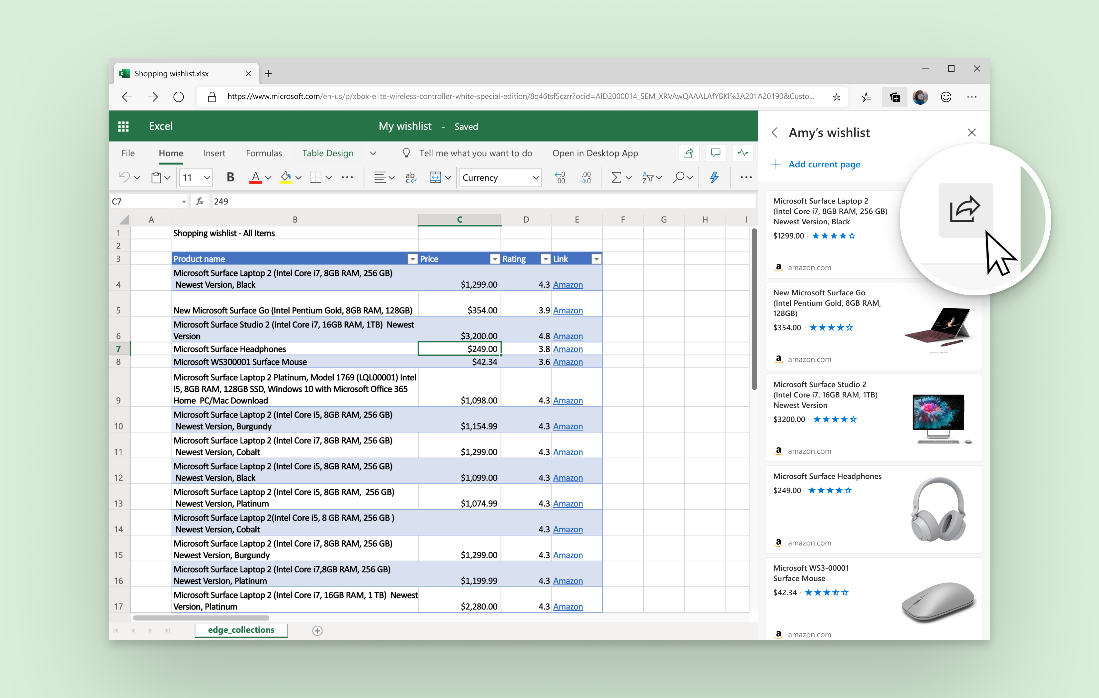
  • Send to Excel: Hit the share icon from the top of the Collections pane and then select Send to Excel. Your content will appear on a new tab with pre-populated table(s) that allow you to easily search, sort, and filter the data extracted from the sites you added to your Collection. This is particularly useful for activities like shopping, when you want to compare items.

Screenshot highlighting the Send to Excel button in the Collections pane

  • Copy/paste: Select items by clicking the box in the upper right. A gray bar will appear at the top of the Collections pane. Select the copy icon Copy icon to add those items to your clipboard. Then, paste it into an HTML handler like Outlook by using the context menu or Ctrl+V on your keyboard.

Sending content to Excel is available for Mac and Windows devices running Windows 10 and above. We’ll add support for Windows devices running Windows 7 and 8 soon. Additional functionality, like the ability to send to Word, will also come soon.

Send us feedback

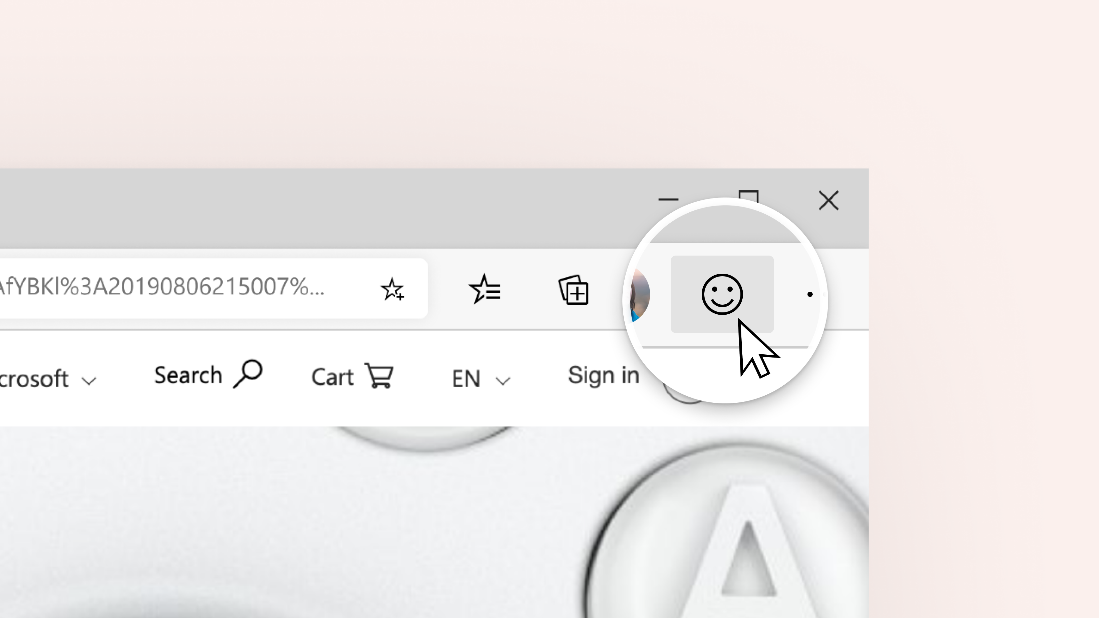
This is the just the first step in our Collections journey and we want to hear from you. If you think something’s not working right, or if there’s some capability you’d like to see added, please send us feedback using the smiley face icon in the top right corner of the browser.

Screenshot highlighting the Send Feedback button in Microsoft Edge

Thanks for being a part of this early preview! We look forward to hearing your feedback.

– The Microsoft Edge Team

The post Collections is now available to test in the Canary channel appeared first on Microsoft Edge Blog.

Now available: Azure DevOps Server 2019 Update 1 RTW

$
0
0

Today, we are announcing the availability of Azure DevOps Server 2019 Update 1. Azure DevOps Server brings the Azure DevOps experience to self-hosted environments. Customers with strict requirements for compliance can run Azure DevOps Server on-premises and have full control over the underlying infrastructure.

This release includes a ton of new features, which you can see in our release notes, and rolls up the security patches that have been released for Azure DevOps Server 2019 and 2019.0.1. You can upgrade to Azure DevOps Server 2019 Update 1 from Azure DevOps Server 2019 or Team Foundation Server 2012 or later.

Here are some key links:

Here are some feature highlights:

Analytics extension no longer needed to use Analytics

Analytics is increasingly becoming an integral part of the Azure DevOps experience. It is an important capability for customers to help them make data driven decisions. For Update 1, we’re excited to announce that customers no longer need an extension to use Analytics. Customers can now enable Analytics inside the Project Collection Settings. New collections created in Update 1 and Azure DevOps Server 2019 collections with the Analytics extension installed that were upgraded will have Analytics enabled by default. You can find more about enabling Analytics in the documentation.

New Basic process

Some teams would like to get started quickly with a simple process template. The new Basic process provides three work item types (Epics, Issues, and Tasks) to plan and track your work.

Accept and execute on issues in GitHub while planning in Azure Boards

You can now link work items in Azure Boards with related issues in GitHub. Your team can continue accepting bug reports from users as issues within GitHub but relate and organize the team’s work overall in Azure Boards.

Pull Request improvements

We’ve added a bunch of new pull request features in Azure Repos. You can now automatically queue expired builds so PRs can autocomplete. We have added support for Fast-Forward and Semi-Linear merging when completing PRs. You can also filter by the target branch when searching for pull requests to make them easier to find.

Simplified YAML editing in Azure Pipelines

We continue to receive feedback asking to make it easier to edit YAML files for Azure Pipelines. In this release, we have added a web editor with IntelliSense to help you edit YAML files in the browser. We have also added a task assistant that supports most of the common task input types, such as pick lists and service connections.

Test result trend (Advanced) widget

The Test result trend (Advanced) widget displays a trend of your test results for your pipelines or across pipelines. You can use it to track the daily count of test, pass rate, and test duration.

Azure Artifacts improvements

This release has several improvements in Azure Artifacts, including support for Python Packages and upstream sources for Maven. Also, Maven, npm, and Python package types are now supported in Pipeline Releases.

Wiki features

There are several new features for the wiki, including permalinks for the wiki pages, @mention for users and groups, support for HTML tags, and markdown templates for formulas and videos. You can also include work item status in a wiki page and can follow pages to get notified when the page is edited, deleted or renamed.

Please provide any feedback via Twitter to @AzureDevOps or in our Developer Community.

The post Now available: Azure DevOps Server 2019 Update 1 RTW appeared first on Azure DevOps Blog.

Reducing SAP implementations from months to minutes with Azure Logic Apps

$
0
0

It's always been a tricky business to handle mission-critical processes. Much of the technical debt that companies assume comes from having to architect systems that have multiple layers of redundancy, to mitigate the chance of outages that may severely impact customers. The process of both architecting and subsequently maintaining these systems has resulted in huge losses in productivity and agility throughout many enterprises across all industries.

The solutions that cloud computing provides help enterprises shift away from this cumbersome work. Instead of spending countless weeks or even months trying to craft an effective solution to the problem of handling critical workloads, cloud providers such as Azure now provide an out-of-the-box way to run your critical processes, without fear of outages, and without incurring costs associated with managing your own infrastructure.

One of the latest innovations in this category, developed by the Azure Logic Apps team, is a new SAP connector that helps companies easily integrate with the ERP systems that are critical to the day-to-day success of a business. Often, implementing these solutions can take teams of people months to get right. However, with the SAP connector from Logic Apps, this process often only takes days, or even hours!

What are some of the benefits of creating workflows with Logic Apps and SAP?

In addition to the broad value that cloud infrastructure provides, Logic Apps can also help:

  • Mitigate risk and reduce time-to-success from months to days when implementing new SAP integrations.
  • Make your migration to the cloud smoother by moving at your own speed.
  • Connect best-in-class cloud services to your SAP instance, no matter where SAP is hosted.

Logic Apps help you turn your SAP instances from worrisome assets that need to be managed, to value-generation centers by opening new possibilities and solutions.

What's an example of this?

Take the following scenario—an on-premises instance of SAP receives sales orders from an e-commerce site for software purchases. In order to complete the entirety of this transaction, there are several points of integration that must happen—between the on-premises instance of the SAP ERP software, the service that generates new software license keys for the customer, the service that generates the customer invoice, and finally a service that emails the newly generated key to the customer, along with the final invoice.

In this scenario, it is necessary to move between both on-premises environments and cloud environments, which can often be tricky to accomplish in a secure way. Logic Apps solves for this by connecting securely and bi-directionally via a virtual network, ensuring that data stays safe.

Leveraging both Azure and Logic Apps, this solution can be done with a team of one, in a minimal amount of time, and with diminished risk of impacting other key business activities.

If you’re interested in trying this for yourself, or learning more about how we implemented this solution, you can follow along with Microsoft Mechanics as they walk through, step-by-step, how they implemented this solution.

Logic Apps SAP thumbnail

How do I get started?

Azure Logic Apps reduces the complexity of creating and managing critical workloads in the enterprise, freeing up your team to focus on delivering new processes that drive key business outcomes.

Get started today:

Logic Apps

Logic Apps and SAP


.NET Framework August 2019 Preview of Quality Rollup

$
0
0

Today, we are releasing the August 2019 Preview of Quality Rollup.

Quality and Reliability

This release contains the following quality and reliability improvements.

BCL1

  • Addresses a crash that occurs after enumerating event logs. [910822]

1 Base Class Library (BCL)


Getting the Update

The Preview of Quality Rollup is available via Windows Update, Windows Server Update Services, and Microsoft Update Catalog.

Microsoft Update Catalog

You can get the update via the Microsoft Update Catalog. For Windows 10, NET Framework 4.8 updates are available via Windows Update, Windows Server Update Services, Microsoft Update Catalog.  Updates for other versions of .NET Framework are part of the Windows 10 Monthly Cumulative Update.

Note: Customers that rely on Windows Update and Windows Server Update Services will automatically receive the .NET Framework version-specific updates. Advanced system administrators can also take use of the below direct Microsoft Update Catalog download links to .NET Framework-specific updates. Before applying these updates, please ensure that you carefully review the .NET Framework version applicability, to ensure that you only install updates on systems where they apply.

The following table is for Windows 10 and Windows Server 2016+ versions.

Product Version Cumulative Update
Windows 10 1809 (October 2018 Update)
Windows Server 2019

4512192
.NET Framework 3.5, 4.7.2 Catalog
4511517
.NET Framework 3.5, 4.8 Catalog
4511522
Windows 10 1803 (April 2018 Update)  


.NET Framework 3.5, 4.7.2 Catalog
4512509
.NET Framework 4.8 Catalog
4511521
Windows 10 1709 (Fall Creators Update)
.NET Framework 3.5, 4.7.1, 4.7.2 Catalog
4512494
.NET Framework 4.8 Catalog
4511520
Windows 10 1703 (Creators Update)  
.NET Framework 3.5, 4.7, 4.7.1, 4.7.2 Catalog
4512474
.NET Framework 4.8 Catalog
4511519
Windows 10 1607 (Anniversary Update)
Windows Server 2016
 
.NET Framework 3.5, 4.6.2, 4.7, 4.7.1, 4.7.2 Catalog
4512495
.NET Framework 4.8 Catalog
4511518


The following table is for earlier Windows and Windows Server versions.

Product Version Preview of Quality Rollup
Windows 8.1
Windows RT 8.1
Windows Server 2012 R2
Catalog
4512195
.NET Framework 3.5 Catalog
4507005
.NET Framework 4.5.2 Catalog
4506999
.NET Framework 4.6, 4.6.1, 4.6.2, 4.7, 4.7.1, 4.7.2 Catalog
4511515
.NET Framework 4.8 Catalog
4511524
Windows Server 2012 Catalog
4512194
.NET Framework 3.5 Catalog
4507002
.NET Framework 4.5.2 Catalog
4507000
.NET Framework 4.6, 4.6.1, 4.6.2, 4.7, 4.7.1, 4.7.2 Catalog
4511514
.NET Framework 4.8 Catalog
4511523
Windows 7 SP1
Windows Server 2008 R2 SP1

Catalog
4512193
.NET Framework 3.5.1 Catalog
4507004
.NET Framework 4.5.2 Catalog
4507001
.NET Framework 4.6, 4.6.1, 4.6.2, 4.7, 4.7.1, 4.7.2 Catalog
4511516
.NET Framework 4.8 Catalog
4511525
Windows Server 2008
Catalog
4512196
.NET Framework 2.0, 3.0 Catalog
4507003
.NET Framework 4.5.2 Catalog
4507001
.NET Framework 4.6 Catalog
4511516


Previous Monthly Rollups

The last few .NET Framework Monthly updates are listed below for your convenience:

The post .NET Framework August 2019 Preview of Quality Rollup appeared first on .NET Blog.

Make games with Visual Studio for Mac and Unity

$
0
0

Do you want to make games? Maybe you’re like me and thought it sounded too hard. I’ve tinkered in game development for the past few years and learned it can be simpler than I thought. If you’re curious about game development like I am, follow along to learn how you can get started creating your first game using C# with Unity and Visual Studio for Mac.

Getting started

Download and install Unity and Visual Studio for Mac using the Unity Hub. Once your installation is complete, launch the Unity Hub and click the New button to create a 2D project. Once the project is created, the Unity Editor will launch and we’re ready to get started. I won’t cover the basics of the Unity Editor here, but if you’d like to learn them check out the Unity Basics workshop at Unity Learn. The workshop will introduce you to the layout, what each piece of the UI does, and the information it contains.

The game board

Many puzzle and strategy games use a game board. A tic-tac-toe board isn’t traditionally dynamic, so I’m keeping it simple by using an image I’ve created. I’m using a new Image in the scene to display the PNG. The Image is a special GameObject for displaying graphics that render in 2D space. Read more about what a GameObject is and why it’s important in the Unity documentation.

The next thing I’m doing is adding nine Button objects that players can click on to select the space on the board for their X or O. This is a simple way to handle interaction and works great for Tic-tac-toe. When you click on a space, a Textobject will be updated with the current players mark. Here’s what the scene looks like so far:

scene view of Unity editor showing tic tac toe board

Interaction and updating the board

At this stage, I’ve only set up my game board. To handle the game logic, I’m creating a few new C# scripts – GameManager and ClickableSpace. The GameManager class will handle game play while ClickableSpace defines the behavior when a button on the board is clicked. You can create new C# scripts inside Unity or Visual Studio for Mac. Double-clicking a C# file from Unity will open the file in Visual Studio for Mac, ready for you to edit and debug code.

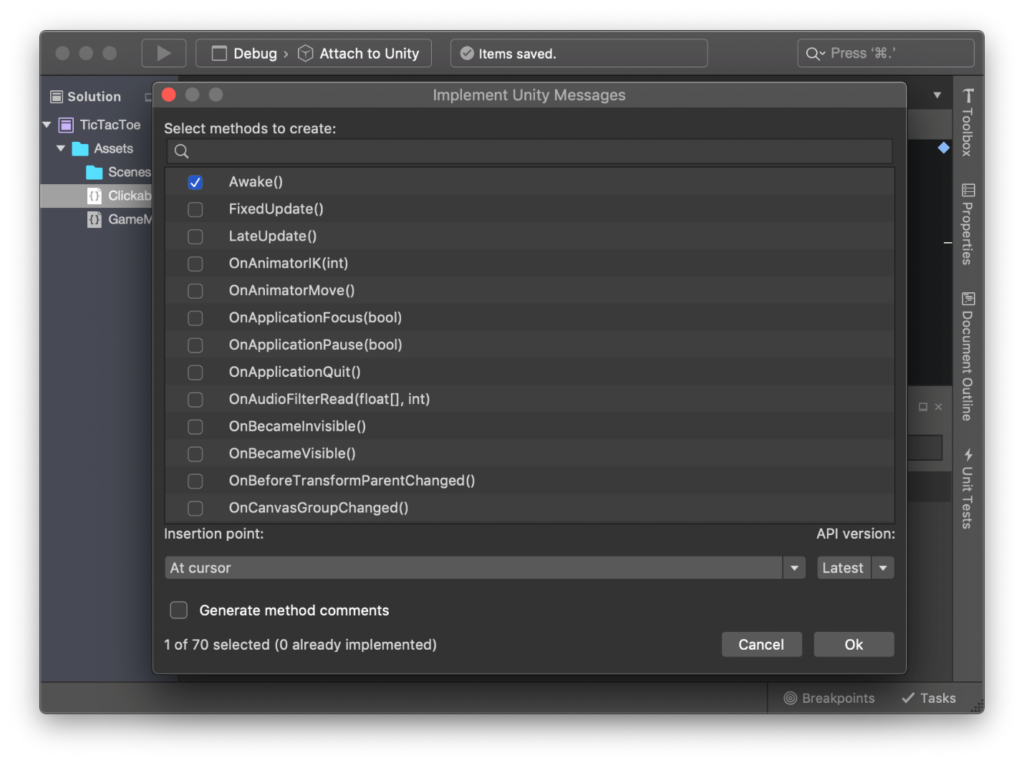
The GameManager class is a MonoBehaviour class, which means it has some special behavior specific to Unity projects. I’m using the MonoBehaviour Scripting Wizard (Command+Shift+M) to learn about the special Unity message functions that can be called during the life cycle of a script. In this case, the Awake method is fine for initializing the game board.

MonoBehaviour scripting wizard in Visual Studio for Mac

When you click on the board, ClickableSpace will update the Textobject to have an X or O and then tell the GameManager to check if there is a win or draw condition with the CompleteTurn() method. I’m writing this logic inside the SelectSpace() function that acts as the event handler that my Unity Button will call.

public class ClickableSpace : MonoBehaviour
{
    public GameManager GameManager { get; set; }
    public void SelectSpace()
    {
        GetComponentInChildren<Text>().text = GameManager.CurrentPlayer;
        GameManager.CompleteTurn();
    }
}

To check for the win condition, I’m comparing if all the Text objects match for each combination of the board – rows, columns, and diagonals. If none of those are satisfied and we’ve filled every space of the board, it must be a draw.

public void CompleteTurn()
    {
        moveCount++;
        if(boardSpaceTexts[0].text == CurrentPlayer && boardSpaceTexts[1].text == CurrentPlayer && boardSpaceTexts[2].text == CurrentPlayer)
        {
            GameOver();
        }
        else if (boardSpaceTexts[3].text == CurrentPlayer && boardSpaceTexts[4].text == CurrentPlayer && boardSpaceTexts[5].text == CurrentPlayer)
        {
            GameOver();
        }
        else if (boardSpaceTexts[6].text == CurrentPlayer && boardSpaceTexts[7].text == CurrentPlayer && boardSpaceTexts[8].text == CurrentPlayer)
        {
            GameOver();
        }
        else if (boardSpaceTexts[0].text == CurrentPlayer && boardSpaceTexts[3].text == CurrentPlayer && boardSpaceTexts[6].text == CurrentPlayer)
        {
            GameOver();
        }
        else if (boardSpaceTexts[1].text == CurrentPlayer && boardSpaceTexts[4].text == CurrentPlayer && boardSpaceTexts[7].text == CurrentPlayer)
        {
            GameOver();
        }
        else if (boardSpaceTexts[2].text == CurrentPlayer && boardSpaceTexts[5].text == CurrentPlayer && boardSpaceTexts[8].text == CurrentPlayer)
        {
            GameOver();
        }
        else if (boardSpaceTexts[0].text == CurrentPlayer && boardSpaceTexts[4].text == CurrentPlayer && boardSpaceTexts[8].text == CurrentPlayer)
        {
            GameOver();
        }
        else if (boardSpaceTexts[2].text == CurrentPlayer && boardSpaceTexts[4].text == CurrentPlayer && boardSpaceTexts[6].text == CurrentPlayer)
        {
            GameOver();
        }
        else if(moveCount >= maxMoveCount)
        {
            Draw();
        }
        else
        {
            if (CurrentPlayer == player1)
                CurrentPlayer = player2;
            else
                CurrentPlayer = player1;
        }
    }


Playing the game

The basics are now in place and I can test out the game by running it from the Unity editor. I can jump back over to Visual Studio for Mac and set a break point in any of my scripts if anything needs debugging. The Solution Explorer maps the folder and file layout to match Unity for continence in finding files as I navigate between editors. To start debugging, I can select the Attach to Unity and Play build configuration – so I don’t have to toggle back to Unity first – and then hit the Play button directly in Visual Studio for Mac! I also added a new button that resets the game.

animated image of the tic tac toe game play in the Unity editor

Wrapping up

That’s all there is to it! In just a short time I was able to create a basic tic-tac-toe game using Unity, C#, and Visual Studio for Mac. With the Tools for Unity included in Visual Studio for Mac, I’m able to write and debug my C# code using locals, watches, and breakpoints. I’m encouraging you to give Unity a try! If you want to download the project I created in this post and take it step further, grab it from my GitHub and make it your own. Here are some of my thoughts on what would be great next steps:

  • A scoring system
  • UI Animations
  • Sound
  • Networked multiplayer

If you prefer to follow along step-by-step, Unity Learn has a great tutorial for creating tic-tac-toe using only Unity UI components too. If you have any feedback or questions about working with Unity and Visual Studio for Mac, reach out to the team on the Visual Studio for Mac Twitter.

The post Make games with Visual Studio for Mac and Unity appeared first on The Visual Studio Blog.

Bing Webmaster Tools simplifies site verification using Domain Connect

$
0
0
In order to submit site information to Bing or to get performance report or access diagnostic tools, webmasters need to verify their site ownership in Bing Webmaster Tools. Traditionally Bing webmaster tools support three verification options,
 
  • Option 1: XML file authentication
  • Option 2: Meta tag authentication
  • Option 3: Add a CNAME record to DNS
Options 1 and 2 requires webmaster to access the site source code to complete the site verification. With Option 3, webmaster can avoid access to site source code but need to access the domain hosting account to edit the CNAME record to hold the verification code provided by Bing Webmaster Tools. To simplify option 3, we announce the support for Domain Connect open standard that will allow webmasters to seamlessly verify their site in Bing Webmaster Tools.

Domain Connect is an open standard that makes it easy for a user to configure DNS for a domain running at a DNS provider (e.g. GoDaddy, 1&1 Ionos, etc) to work with a Service running at an independent Service Provider (e.g. Bing, O365, etc). The protocol presents a simple experience to the user, isolating them from the details of DNS settings and its complexity.

Bing Webmaster Tools verification using Domain Connect is already live for users whose domain is hosted with following DNS providers


Bing webmaster tools will gradually integrate this capability with other DNS providers that support Domain Connect open standard.

Quick guide on how to use Domain Connect feature to verify your site in Bing Webmaster Tools:
 

Step 1: Open a Bing Webmaster Tools account

You can open a free Bing Webmaster Tools account by going to the Bing Webmaster Tools sign-in or sign-up page.  You can sign up using Microsoft, Google or Facebook account.
 

Step 2: Add your website

Once you have a Bing Webmaster Tools account, you can add sites to your account. You can do so by entering the URL of your site into the Add a Site input box and clicking Add


Step 3: Check if your site is supported for Domain Connect protocol

When you Add the website information, Bing Webmaster Tools will do background check to identify if that domain/ website is hosted on DNS provider that has integrated Domain Connect solution with Bing Webmaster Tools. Following view will show in case the site is supported –


In case the site is not supported for Domain Connect protocol then user will see the default verification options as mentioned in top of this blog.
 

Step 4: Verify using DNS provider credentials

On click of Verify, user will be redirected to DNS provider site. Webmaster should sign-in using the account credentials associated with domain/ website under verification.


On successful sign-in, user site will be successfully verified by Bing webmaster tools within few seconds. In certain cases, it may take longer for DNS provider to send the site ownership signal to Bing webmaster tool service.
 
Using the new verification options will significantly reduce the time taken and simplify the site verification process in Bing Webmaster Tools. We encourage you to try out this solution and get more users for your sites on Bing via Bing Webmaster Tools.

In case you face any challenges using this solution you can raise a service ticket with our support team.
We are building another solution to further simplify the site verification process and help webmasters to easily add and verify their site in Bing Webmaster Tools. Watch this space for more!   
 
Additional reference:
https://www.plesk.com/extensions/domain-connect/
https://www.godaddy.com/engineering/2019/04/25/domain-connect/
 
Thanks!
Bing Webmaster Tools team

Growing Web Template Studio

$
0
0

We’re excited to announce Version 2.0 of Microsoft Web Template Studio a cross-platform extension for Visual Studio Code that simplifies and accelerates creating new full-stack web applications.

What’s Web Template Studio?

Web Template Studio (WebTS) is a user-friendly wizard to quickly bootstrap a web application and provides a ReadMe.md with step by step instructions to start developing. Best of all, Web Template Studio is open source on GitHub.

Our philosophy is to help you focus on your ideas and bootstrap your app in a minimal amount of time. We also strive to introduce best patterns and practices. Web Template Studio currently supports React, Vue, and Angular for frontend and Node.js and Flask for backend. You can choose any combination of frontend/backend frameworks to quickly build your project.

We want to partner with the community to see what else is useful and should be added. We know there are many more frameworks, pages, and features to be included and can’t stress enough that this is a work in progress. If there is something you feel strongly about, please let us know. On top of feedback, we’re also willing to accept PRs. We want to be sure we’re building the right thing.

Web Template Studio takes the learnings from its sister project, Windows Template Studio which implements the same concept but for native UWP applications. While the two projects target different development environments and tech stacks, they share a lot of architecture under the hood.

Installing our Staging Weekly build

Install the weekly staging build; just head over to Visual Studio Marketplace’s Web Template Studio page and click “install.” In addition, you’ll need Node and Yarn installed as well.

A Lap Around the new Web Template Studio – What’s new?

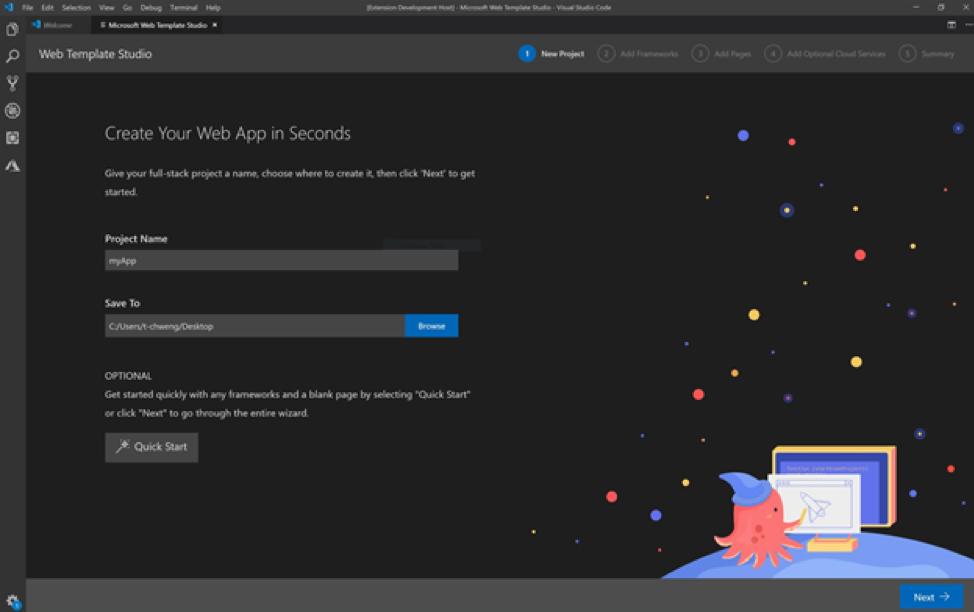
We launch WebTS by simply using the shortcut (ctrl + shift + p) and typing in Web Template Studio. This will fire up the wizard and you’ll be able to start generating a project in no time.

Step 1: Project Name and Save To destination

You don’t even have to fill in the project name and destination path as everything is now automated for you!

We’ve added a Quick Start pane for advanced users that offers a single view of all wizard steps. This lets you generate a new project in just two clicks!

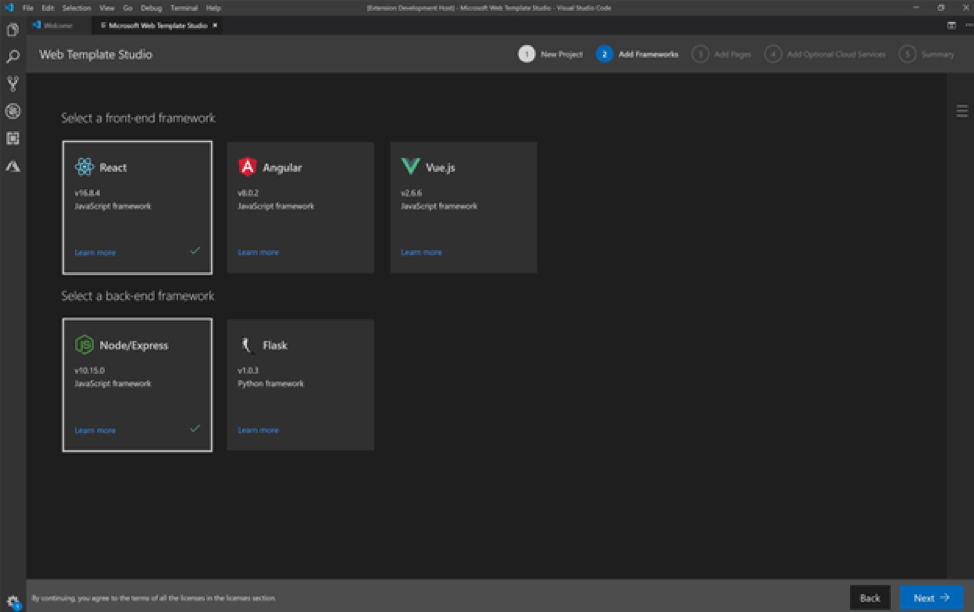
Step 2: Choose your frameworks

Based on community feedback, we added new frameworks: Angular, Vue and Flask.

So now we support the following frameworks for frontend: React.js , Vue.jsAngular. And for backend: Node.js and Flask.

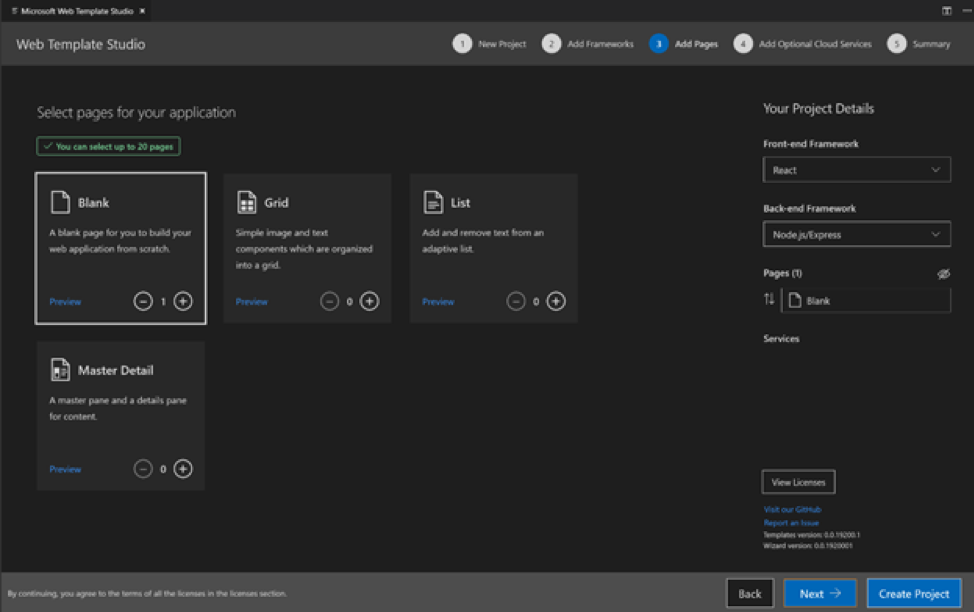
Step 3: Add Pages to your project

This page has been redesigned to give you a smoother experience.

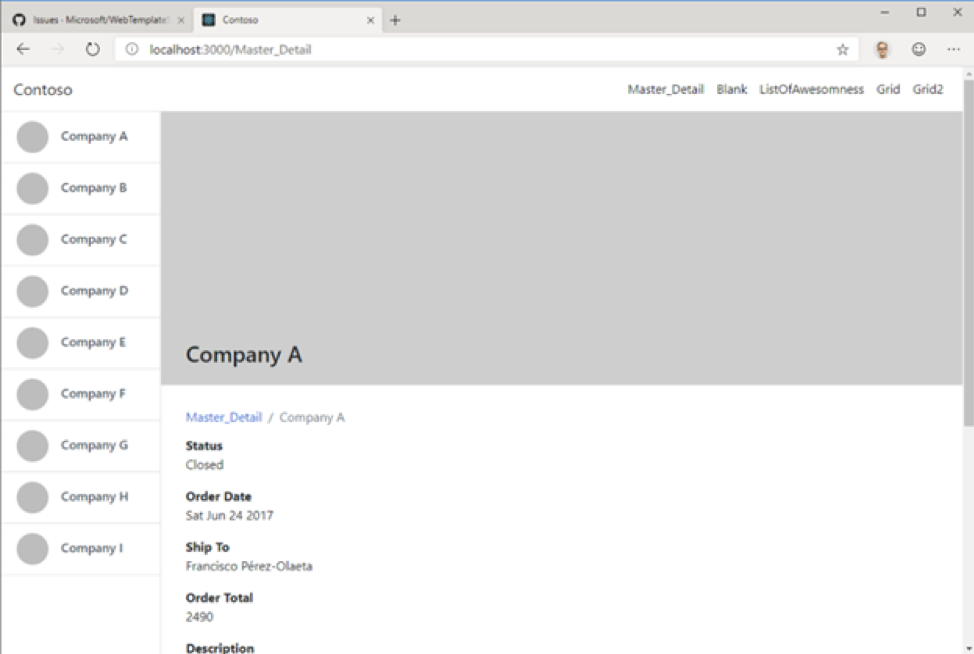
To accelerate app creation, we provide several app page templates that you can use to add common UI pages into your new app. The current page templates include: blank page, grid page, list, master detail. You can click on preview to see what these pages look like before choosing them.

Step 4: Cloud Services

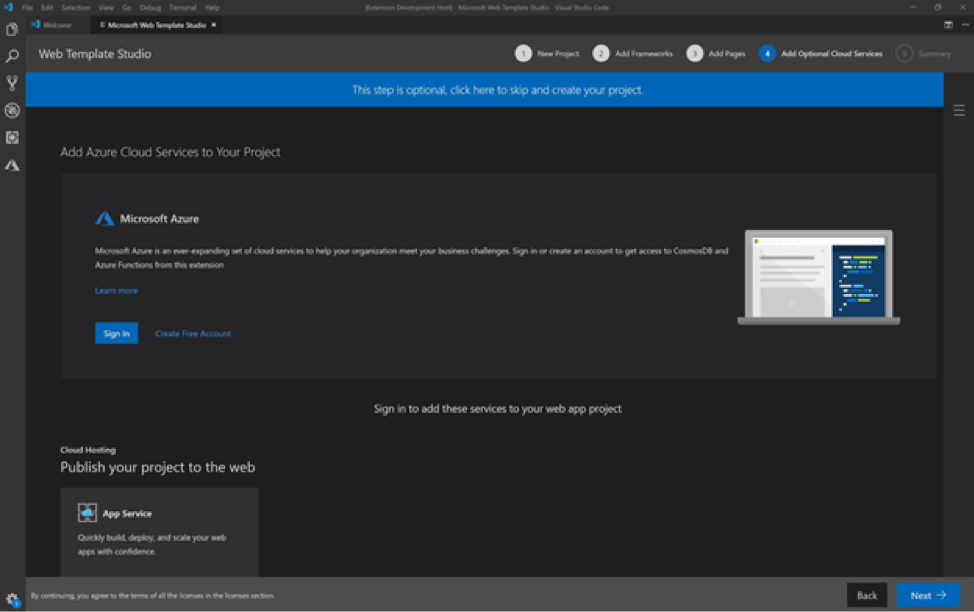
In this new release, we added App Service. We currently support services cover storage (Azure Cosmos DB) and cloud hosting (App Service)!

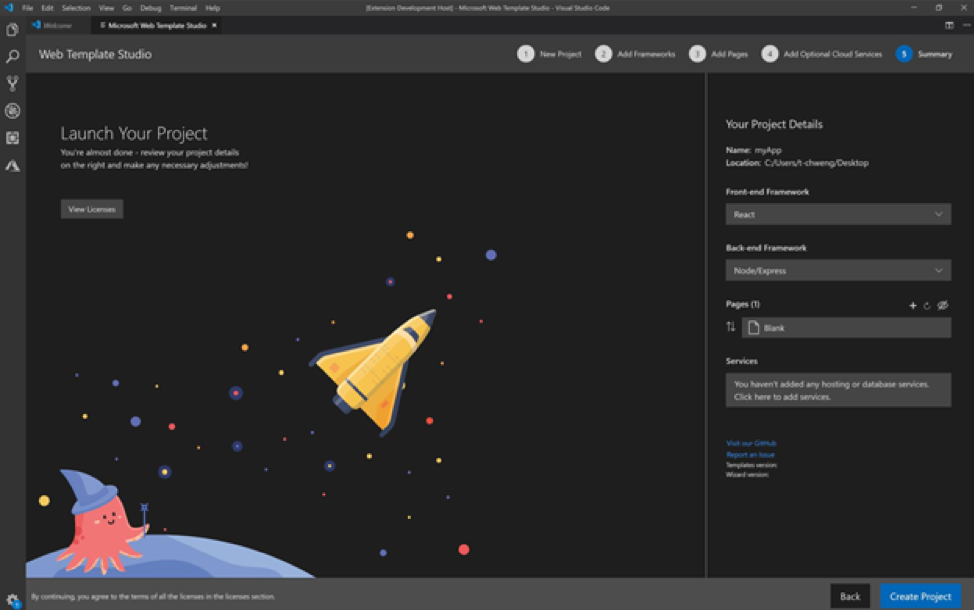
Step 5: Summary and Create Project

This page has been redesigned. You can now see the project details on the right-side bar and you are able to make quick changes to your project before creating it.

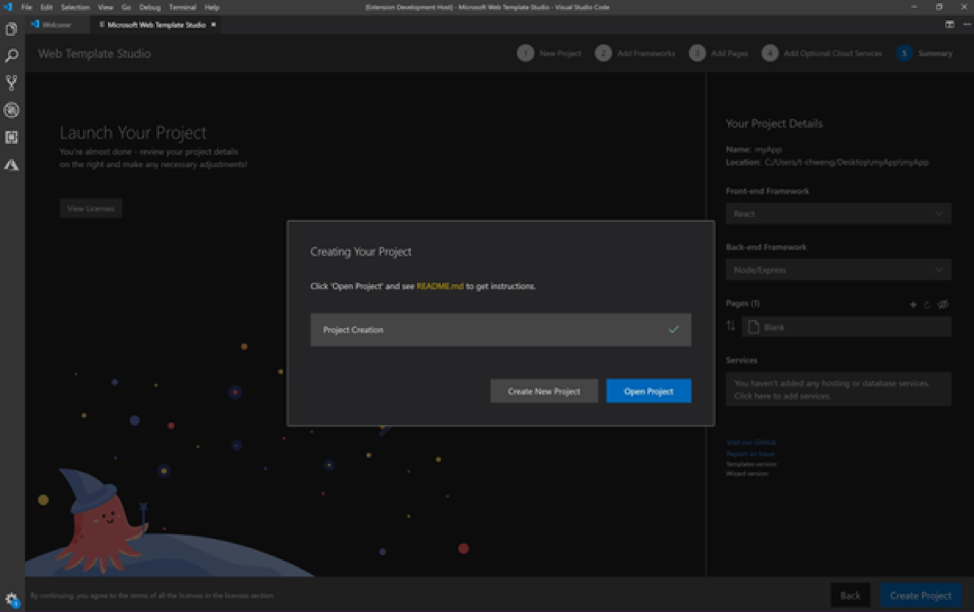
Simply click on Create Project and start coding!

Step 6: Running your app

Click the “Open project in VSCode” link. You can open up your README.md file for helpful tips and tricks and then, to get the webserver up and running. To run your app, you just need to open the terminal then type “yarn install” then “yarn start” and you’re up and going! This generates a web app that gives you a solid starting point. It pulls real data, allowing you to quickly refactor so you can spend your time on more important tasks like your business logic.

Open source and built by Microsoft Garage Interns

Web Template Studio is completely open-source and available now on GitHub. We want this project to follow the direction of the community and would love for you to contribute issues or code. Please read our contribution guidelines for next steps. A public roadmap is currently available and your feedback here will help us shape the direction the project takes.

This project was proudly created by Microsoft Garage interns. The Garage Internship is a unique, startup-style program for talented students to work in groups of 6-8 on challenging engineering projects. The team partnered with teams across Microsoft along with the community to build the project. It has gone through multiple iterations variations to where it is currently today.

The post Growing Web Template Studio appeared first on Windows Developer Blog.

Hey .NET! Have you tried ML.NET?

$
0
0

ML.NET is an open source and cross-platform machine learning framework made for .NET developers.

Using ML.NET you can easily build custom machine learning models for scenarios like sentiment analysis, price prediction, sales forecasting, recommendation, image classification, and more.

ML.NET 1.0 was released at //Build 2019, and since then the team has been working hard on adding more features and capabilities.

Through the survey below, we would love to get feedback on how we can make your journey to infuse Machine Learning in your apps easier with .NET.

Help shape and improve ML.NET for your needs by taking the short survey below!

   Take survey!

The post Hey .NET! Have you tried ML.NET? appeared first on .NET Blog.

Sign-in and sync with work or school accounts in Microsoft Edge Insider builds

$
0
0

A top piece of feedback we’ve heard from Microsoft Edge Insiders is that you want to be able to roam your settings and browsing data across your work or school accounts in Microsoft Edge. Today, we’re excited to announce that Azure Active Directory work and school accounts now support sign-in and sync in the latest Canary, Dev, and Beta channel preview builds of Microsoft Edge.

By signing in with a work or school account, you will unlock two great experiences: your settings will sync across devices, and you’ll enjoy fewer sign-in prompts thanks to single sign-on (Web SSO).

Personalized experiences across devices

When signed in with an organizational account on any preview channel, Microsoft Edge is able to sync your browser data across all your devices that are signed in with the same account. Today, your favorites, preferences, passwords, and form-fill data will sync; in future previews, we’ll expand this to support other attributes like your browsing history, installed extensions, and open tabs. You can control which available attributes to sync, once you enable the feature from the sync settings page. Sync makes the web a more personal, seamless experience across all devices—the less time you have to spend managing your experience, the more time you’ll have to get things done.

Single sign-on across work or school sites

Once you’ve signed in to your organizational account in Microsoft Edge, we’ll use those credentials to authenticate you to websites and services that support Web Single Sign-On. This helps keep you productive by cutting down on unnecessary sign-in prompts on the web. When you access web content which is authenticated with your signed in account, Microsoft Edge will simply sign you in to the website you’re trying to access.

To try this, just navigate to Office.com while signed into Edge with your work or school account. Notice that you didn’t need to sign in with your username and password—you are simply authenticated to the website and can access your content immediately. This also works on other web properties that recognize the organizational account you are signed in to.

How to sign in with your work or school account

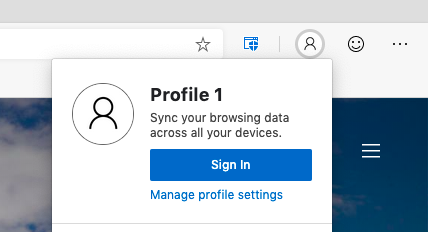
To get started with an organizational account in Microsoft Edge, all you have to do is sign in and turn on sync. Just click the profile icon to the right of your address bar and click “Sign In” (if you’re already signed in with a personal account, you’ll have to “Add a profile” first and then sign into the new profile with your work or school account.)

Screenshot showing the "Sign in" profile button in Microsoft Edge

At the sign-in prompt, select any of your existing work or school accounts (on Windows 10) or enter your email, phone, or Skype credentials into the sign-in field (on macOS or older versions of Windows) and sign in.

Once you’re signed in, follow the prompts asking if you want to sync your browsing data to enable sync. That’s it! To learn more about sync, check out our previous article on syncing in Microsoft Edge preview channels. You can always change your settings or disable sync at any time by clicking your profile icon and selecting “Manage profile settings.”

What do you think of sign-in with your work or school account?

We are excited to bring you work/school account sign-in and sync in the Microsoft Edge Insider channels. We hope to make your everyday web surfing experience a breeze. However, we want to be sure that sign-in, as well as all the personalized experiences, actually work for you. Please give sign-in a try and let us know how you like it – or not. If you run into any issues, use the in-app feedback button to submit the details. If you have other feedback about work/school account sign-in or personalized experiences, we welcome your comments below.

Thank you for helping us build the next version of Microsoft Edge that’s right for you.

Avi Vaid, Program Manager, Microsoft Edge

The post Sign-in and sync with work or school accounts in Microsoft Edge Insider builds appeared first on Microsoft Edge Blog.

Review: UniFi from Ubiquiti Networking is the ultimate prosumer home networking solution

$
0
0

UniFi mapI LOVE my Amplifi Wi-Fi Mesh Network. I've had it for two years and it's been an absolute star performer. We haven't had a single issue. Rock solid. That's really saying something. From unboxing to installation to running it (working from home for a tech company, so you know I'm pushing this system) it's been totally stable. I recommend Amplifi unreservedly to any consumer or low-key pro-sumer who has been frustrated with their existing centrally located router giving them reliable wi-fi everywhere in their home.

That said...I recently upgraded my home internet service provider. For the last 10 years I've had fiber optic to the house with 35 Mbp/s up/down and it's been great. Then I called them a a few years back and got 100/100. The whole house was presciently wired by me for Gigabit back in 2007 (!) with a nice wiring closet and everything. Lately 100/100 hasn't been really cutting it when I'm updating a dozen laptops for a work event, copying a VM to the cloud while my spouse is watching 4k netflix and two boys are updating App Store apps. You get the idea. Modern bandwidth requirements and life has changed since 2007. We've got over 40 devices on the network now and many are doing real work.

I called an changed providers to a cable provider that offered true gigabit. However, I was rarely getting over 300-400 Mbp/s on my Amplifi. There is a "hardware NAT" option that really helps, but short of running the Amplifi in Bridged Mode and losing a lot of its epic features, it was clear that I was outgrowing this prosumer device.

Give I'm a professional working at home doing stuff that is more than the average Joe or Jane, what's a professional option?

UniFi from Ubiquiti

Amplifi is the consumer/prosumer line from Ubiquiti Networks and UniFi (UBNT) is the professional line.  You'll literally find these installed at business or even sports stadiums. This is serious gear.

Let me be honest. I knew UniFi existed. Knew (I thought) all about it and I resisted. My friends and fellow nerds insisted it was easy but I kept seeing massive complex network diagrams and convinced myself it wasn't worth the hassle.

My friends, I was wrong. It's not hard. If you are doing business at home, have a gigabit network pipe, a wired home network, and/or have a dozen or more network devices, you're a serious internet person and you might want to consider serious internet networking gear.

Everything is GREAT

Now, UniFi is more expensive than Amplifi as it's pro gear. While an Amplifi Mesh WiFi system is just about $300-350 USD, UniFi Pro gear will cost more and you'll need stuff to start out and it won't always feel intuitive as you plan your system. It is worth it and I'm thrilled with the result. The flexibility and customizability its offered has been epic. There are literally no internet issues in our house or property anymore. I've even been able to add wired and wireless non-cloud-based security cameras throughout the property. Additionally, remember how the house is already wired in nearly every room with Cat6 (or Cat5e) cabling? UniFi has reintroduced me to the glorious world of PoE+ (Power over Ethernet) and removed a half dozen AC wall plugs from my system.

Plan your Network

You can test out the web-based software yourself LIVE at https://demo.ui.com and see what managing a large network would be like. Check out their map of the FedEx Forum Stadium and how they get full coverage. You can see a simulated map of my house (not really my house) in the screenshot above. When you set up a controller you can place physical devices (ones you have) and test out virtual devices (ones you are thinking of buying) and see what they would look like on a real map of your home (supplied by you). You can even draw 3D walls and describe their material (brick, glass, steel) and their dB signal loss.

UniFi.beginner.950

When you are moving to UniFi you'll need:

  • USG - UniFi Security Gateway - This has 3 gigabit points and has a WAN port for your external network (plug your router into this) and a LAN port for your internal network (plug your internal switch into this).
    • This is the part that doles out DHCP.
  • UniFi Cloud Key or Cloud Key Gen2 Plus
    • It's not intuitive what the USG does vs the Cloud Key but you need both. I got the Gen2 because it includes a 1TB hard drive that allows me to store my security video locally. It also is itself a PoE client so I don't need to plug it into the wall. I just wired it with a single Ethernet cable to the PoE switch below and left it in the wiring closet. There's a smaller cheaper Cloud Key if you don't need a hard drive.
    • You don't technically need a Cloud Key I believe, as all the UniFi Controller Software is free and you can run it in on any machine you have laying around. Folks have run them on any Linux or Windows machine they have, or even on a Synology or other NAS. I like the idea of having it "just work" so I got the Cloud Key.
  • UniFi Switch (of some kind and number of ports)
    • 8 port 150 watt UniFi Switch
    • 24 port UniFi Switch - 24 ports may be overkill for most but it's only 8 lbs and will handle even the largest home network. And it's under $200 USD right now on Amazon
    • 24 port UniFi Switch with PoE - I got this one because it has 250W of PoE power. If you aren't interested in power over ethernet you can save money with the non-PoE version or a 16 port version but I REALLY REALLY recommend you use PoE because the APs work better with it.
      PoE switch showing usage on many ports

Now once you've got the administrative infrastructure above, you just need to add whatever UniFi APs - access points - and/or optional cameras that you want!

NOTE/TIP - A brilliant product from Ubiquiti that I think is flying under the radar is the Unifi G3 Flex PoE camera. It's just $75 and it's tiny but it's absolutely brilliant. Full 1080p video and night vision. I'll talk about the magic of PoE later on but you can just plug this in anywhere in the house - no AC adapter - and you've got a crystal clear security camera or cameras anywhere in the house. They are all powered from the PoE switch!

I had a basic networking closet I put the USG Gateway into the closet with a patch cable to the cable modem (the DOCSIS 3.1 cable modem that I bought because I got tired of renting it from the service provider) then added the Switch with PoE, and plugged the Cloud Key into it. Admin done.

Here's the lovely part.

Since I have cable throughout the house, I can just plug in the UniFi Access Points in various room and they get power immediately. I can try different configs and test the signal strength. I found the perfect config after about 4 days of moving things around and testing on the interactive map. The first try was fine but I strove for perfect.

There's lots of UniFi Access Points to choose from. The dual radio Pro version can get pretty expensive if you have a lot so I got the Lite PoE AP. You can also get a 5 pack of the nanoHD UniFi Access Points.

These Access Points are often mounted in the ceiling in pro installations, and in a few spots I really wanted something more subtle AND I could use a few extra Ethernet ports. Since I already had an Ethernet port in the wall, I could just wall mount the UniFi Wall Mounted AP. It's both a wireless AP that radiates outward into the room AND it turns your one port into two, or you can get one that becomes a switch with more ports and extends your PoE abilities. So I can add this to a room, plug a few devices in AND a PoE powered Camera with no wall-warts or AC adapters!

NOTE: I did need to add a new ethernet RJ45 connector to plug into the female connector of the UniFi in-wall AP. Just be sure to plan and take inventory. You may already have full cables with connectors pulled to your rooms. Be aware.

There are a TON of great Wireless AP options from UniFi so make sure you explore them all and understand what you want.

In-Wall AP

Here's the resulting setup and choices I made, as viewed in the UniFi Controller Software:

List of Ubnt devices

I have the Gateway, the Switch with PoE, and five APs. Three are the disc APs and two are in-wall APs. They absolutely cover and manage my entire two story house and yards front and back. It's made it super easy for me to work from home and be able to work effectively from any room. My kids and family haven't had any issues with any tablets or phones.

As of the time of these writing I have 27 wireless devices on the system and 11 wired (at least those are the ones that are doing stuff at this hour).

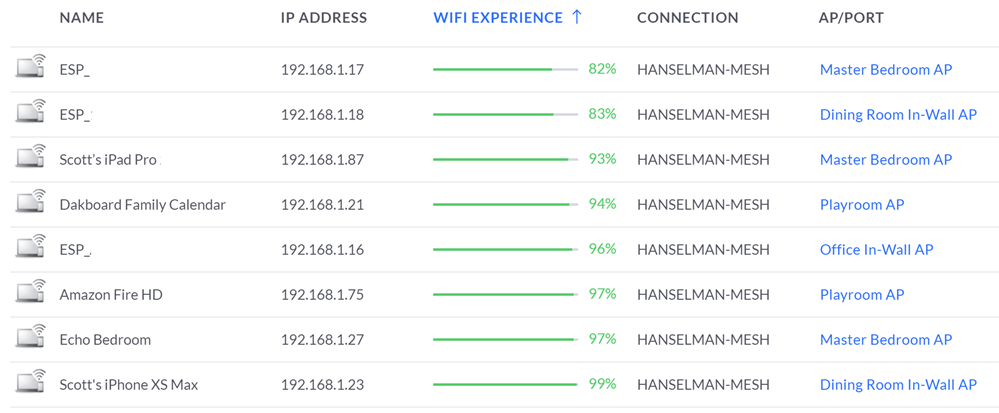
My devices as viewed in the UniFi controller

Note how it will tell you how each device's WiFi experience is. I use this Experience information to help me manage the network and see if the APs are appropriately placed. There is a TON of great statistics and charts and graphics. It's info-rich to say the LEAST.

NOTE: To answer a common question - In an installation like this you've got a single SSID even though there's lots of APs and your devices will quietly and automatically roam between them!
Log showing roaming between APs

The iPhone app is very full-featured as well and when you've got deep packet introspection turn on you can see a ton of statistical information at the price of a smidge of throughput performance.

iPhone StatsiPhone Bandwidth

I have had NO problem hitting 800-950Mbs over wired and I feel like there's no real limit to the perf of this system. I've done game streaming over Steam and Xbox game streaming for hours without a hiccup. Netflix doesn't buffer anymore, even on the back porch.

a lot of bandwidth with no drops

You can auto-optimize, or you can turn off a plethora of feature and manage everything manually. I was able to twitch a few APs to run their 2.4Ghz Wi-Fi radios on less crowded channels in order to get out of the way of the loud neighbors on channel 11.

I have a ton of control over the network now, unlimited expandability and it has been a fantastically stable network. All the APs are wire backed and the wireless bandwidth is rock solid. I've been extremely impressed with the clean roaming from room to room while streaming from Netflix. It's a tweakers (ahem) dream network.

* I use Amazon referral links and donate the little money to my kids' school. You support charter schools when you use these links.


Sponsor: Get the latest JetBrains Rider with WinForms designer, Edit & Continue, and an IL (Intermediate Language) viewer. Preliminary C# 8.0 support, rename refactoring for F#-defined symbols across your entire solution, and Custom Themes are all included.


© 2019 Scott Hanselman. All rights reserved.
     

IRAP protected compliance from infra to SAP application layer on Azure

$
0
0

This post was co-authored by Rohit Kumar Cherukuri, Vice President – Marketing, Cloud4C

Australian government organizations are looking for cloud managed services providers capable of providing deployment of a platform as a service (PaaS) environment suitable for the processing, storage, and transmission of AU-PROTECTED government data that is compliant with the objectives of the Australian Government Information Security Manual (ISM) produced by the Australian Signals Directorate (ASD).

One of Australia’s largest federal agencies that is responsible for improving and maintaining finances of the state was looking to implement the Information Security Registered Assessors Program (IRAP) which is critical to safeguard sensitive information and ensure security controls around transmission, storage, and retrieval.

The Information Security Registered Assessors Program is an Australian Signals Directorate initiative to provide high-quality information and communications technology (ICT) security assessment services to the government.

The Australian Signals Directorate endorses suitably-qualified information and communications technology professionals to provide relevant security services that aim to secure broader industry and Australian government information and associated systems.

Cloud4C took up this challenge to enable this federal client on the cloud delivery platforms. Cloud4C analyzed and assessed the stringent compliance requirements within the Information Security Registered Assessors Program guidelines.

Following internal baselining, Cloud4C divided the whole assessment into three distinct categories – physical, infrastructure, and managed services. The Information Security Registered Assessors Program has stringent security controls around these three specific areas.

Cloud4C realized that the best way to successfully meet this challenge was to partner and share responsibilities to achieve an improbable but successful and worthy assessment together. In April 2018, the Australian Cyber Security Center (ACSC) announced the certification of Azure and Office 365 at the PROTECTED classification. Microsoft became the first and only public cloud provider to achieve this level of certification. Cloud4C partnered with Microsoft to deploy the SAP applications and SAP HANA database on Azure and utilized all the Information Security Registered Assessors Program compliant infrastructure benefits to enable seamless integration of native and marketplace tools and technologies on Azure.

Cloud4C identified the right Azure data center in Australia, Australia Central and Australia Central 2, which had undergone a very stringent Information Security Registered Assessors Program assessment for physical security and information and communications equipment placements.

This compliance by Azure for infrastructure and disaster recovery gave Cloud4C a tremendous head-start as a managed service provider in focusing energies to address the majority of remaining controls that were focused solely for the cloud service provider.

The Information Security Registered Assessors Program assessment for Cloud4C involved meeting 412 high risks and 19 of the most critical security aspects distributed across 22 major categories, after taking out the controls that were addressed by Azure disaster recovery.

Solution overview

The scope of the engagement was to configure and manage the SAP landscape onto Azure with managed services up to the SAP basis layer while maintaining the Information Security Registered Assessors Program protected classification standards for the processing, storage, and retrieval of classified information. As the engagement model is PaaS, the responsibility matrix was up to the SAP basis layer and application managed services were outside the purview of this engagement.

Platform as a service with single service level agreement and Information Security Registered Assessors Program protected classification

The proposed solution included various SAP solutions including SAP ERP, SAP BW, SAP CRM, SAP GRC, SAP IDM, SAP Portal, SAP Solution Manager, Web Dispatcher, and Cloud Connector with a mix of databases including SAP HANA, SAP MaxDB, and former Sybase databases. Azure Australia Central, the primary disaster recovery, and Australia Central 2, the secondary disaster recovery region, were identified as the physical disaster recovery locations for building the Information Security Registered Assessors Program protected compliant environment. The proposed architecture encompassed certified virtual machine stock keeping units (SKUs) for SAP workloads, optimized storage and disks configuration, right network SKUs with adequate protection, a mechanism to achieve high availability, disaster recovery, backup, and monitoring, an adequate mix of native and external security tools, and most importantly, processes and guidelines around service delivery.

The following Azure services were considered as part of the proposed architecture:

  • Azure Availability Sets
  • Azure Active Directory
  • Azure Privileged Identity Management
  • Azure Multi-Factor Authentication
  • Azure ExpressRoute gateway
  • Azure application gateway with web application firewall
  • Azure Load Balancer
  • Azure Monitor
  • Azure Resource Manager
  • Azure Security Center
  • Azure storage and disk encryption
  • Azure DDoS Protection
  • Azure Virtual Machines (Certified virtual machines for SAP applications and SAP HANA database)
  • Azure Virtual Network
  • Azure Network Watcher
  • Network security groups

Information Security Registered Assessors Program compliance and assessment process

Cloud4C navigated through the accreditation framework with the help of the Information Security Registered Assessors Program assessor, who helped to understand and implement the Australian government security and build the technical feasibility of porting SAP applications and the SAP HANA database to the Information Security Registered Assessors Program protected setup on the Azure protected cloud.

The Information Security Registered Assessors Program assessor assessed the implementation, appropriateness, and effectiveness of the system's security controls. This was achieved through two security assessment stages, as dictated in the Australian Government Information Security Manual (ISM):

  • Stage 1: Security assessment identifies security deficiencies that the system owner rectifies or mitigates
  • Stage 2: Security assessment assesses residual compliance

Cloud4C has achieved successful assessment under all applicable information security manual controls, ensuring the zero risk environment and protection of the critical information systems with support from Microsoft.

The Microsoft team provided guidance around best practices on how to leverage Azure native tools to achieve compliance. The Microsoft solution architect and engineering team participated in the design discussions and brought an existing knowledge base around Azure native security tools, integration scenarios for third party security tools, and possible optimizations in the architecture.

During the assessment, Cloud4C and the Information Security Registered Assessors Program assessor performed the following activities:

  • Designed the system architecture incorporating all components and stakeholders involved in the overall communication
  • Mapped security compliance against the Australian government security policy
  • Identified physical facilities, the Azure Data centers Australia Central and Australia Central 2, that are certified by the Information Security Registered Assessors Program
  • Implemented Information Security Manual security controls
  • Defined mitigation strategies for any non-compliance
  • Identified risks to the system and defined the mitigation strategy

Placeholder

Steps to ensure automation and process improvement

  • Quick deployment using Azure Resource Manager (ARM) templates combined with tools. This helped in the deployment of large landscapes comprising of more than 100 virtual machines and 10 SAP solutions in less than a month.
  • Process automation using Robotic Process Automation (RPA) tools. This helped to identify the business as usual stage within the SAP eco-system deployed for the Information Security Registered Assessors Program environment and enhanced the process to ensure minimum disruption to actual business processes on top of automation that takes care of the infrastructure level ensuring the application availability.

Learnings and respective solutions that were implemented during the process

  • The Azure Central and Azure Central 2 regions were connected to each other over fibre links offering less than sub-ms latency, with the SAP application and SAP HANA database replication in synchronous mode and zero recovery point objective (RPO) was achieved.
  • Azure Active Directory Domain Services were not available in the Australia Central region, so the Azure South-East region was leveraged to ensure seamless delivery.
  • Azure Site Recovery was successfully used for replication of an SAP Max DB database.
  • Traffic flowing over Azure ExpressRoute was not encrypted by default, it was encrypted using a network virtual appliance from a Microsoft security partner.

Complying with the Information Security Registered Assessors Program requires Australian Signals Directorate defined qualifications to be fulfilled and to pass through assessment phases. Cloud4C offered the following benefits:

  • Reduced time to market - Cloud4C completed the assessment process in 9 months as compared to the industry achievement of nearly 1-2 years.
  • Cloud4C’s experience and knowledge of delivering multiple regions and industry specific compliances for customers on Azure helped in mapping the right controls with Azure native and external security tools.

The partnership with Microsoft helped Cloud4C reach another milestone and take advantage of all the security features that Azure Hyperscaler has to offer to meet stringent regulatory and geographic compliances.

Cloud4C has matured in the use of many of the security solutions that are readily available from Azure Native, as well as Azure Marketplace to reduce time-to-market. Cloud4C utilized the Azure portfolio to its fullest in terms of securing the customer's infrastructure as well as encourage a secure culture in supporting their clients as an Azure Expert Managed Service Provider (MSP). The Azure security portfolio has been growing and so has Cloud4C's use of its solution offerings.

Cloud4C and Microsoft plan to take this partnership to even greater heights in terms of providing an unmatched cloud experience to customers in the marketplace across various geographies and industry verticals.

Learn more

IoT Plug and Play is now available in preview

$
0
0

Today we are announcing that IoT Plug and Play is now available in preview! At Microsoft Build in May 2019, we announced IoT Plug and Play and described how it will work seamlessly with IoT Central. We demonstrated how IoT Plug and Play simplifies device integration by enabling solution developers to connect and interact with IoT devices using device capability models defined with the Digital Twin definition language. We also announced a set of partners who have launched devices and solutions that are IoT Plug and Play enabled. You can find their IoT Plug and Play certified devices at the Azure Certified for IoT device catalog.

With today’s announcement, solution developers can start using Azure IoT Central or Azure IoT Hub to build solutions that integrate seamlessly with IoT devices enabled with IoT Plug and Play. We have also launched a new Azure Certified for IoT portal, for device partners interested to streamline the device certification submission process and get devices into the Azure IoT device catalog quickly.

This article outlines how solution developers can use IoT Plug and Play devices in their IoT solutions, and how device partners can build and certify their products to be listed in the catalog.

Faster device integration for solution developers

Azure IoT Central is a fully managed IoT Software as a Service (SaaS) offering that makes it easy to connect, monitor, and manage your IoT devices and products. Azure IoT Central simplifies the initial setup of your IoT solution and cuts the management burden, operational costs, and overhead of a typical IoT project. Azure IoT Central integration with IoT Plug and Play takes this one step further by allowing solution developers to integrate devices without writing any embedded code. IoT solution developers can choose devices from a large set of IoT Plug and Play certified devices to quickly build and customize their IoT solutions end-to-end. Solution developers can start with a certified device from the device catalog and customize the experience for the device, such as editing display names or units. Solution developers can also add dashboards for solution operators to visualize the data; as part of this new release, developers have a broader set of visualizations to choose from. There is also the option to auto generate dashboards and visualizations to get up and running quickly. Once the dashboard and visualizations are created, solution developers can run simulations based on real models from the device catalog. Developers can also integrate with the commands and properties exposed by IoT Plug and Play capability models to enable operators to effectively manage their device fleets. IoT Central will automatically load the capability model of any certified device, enabling a true Plug and Play experience!

Another option available for developers who’d like more customization is to build IoT solutions with Azure IoT Hub and IoT Plug and Play devices. With today’s release, Azure IoT Hub now supports RESTful digital twin APIs that expose the capabilities of IoT Plug and Play device capability models and interfaces. Developers can set properties to configure settings like alarm thresholds, send commands for operations such as resetting a device, route telemetry, and query which devices support a specific interface. The most convenient way is to use the Azure IoT SDK for Node.js (other languages are coming soon). And all devices enabled for IoT Plug and Play in the Azure Certified for IoT device catalog will work with IoT Hub just like they work with IoT Central.

An image of the certified device browsing page.

Streamlined certification process for device partners

The Azure Certified for IoT device catalog allows customers to quickly find the right Azure IoT certified device to quickly start building IoT solutions. To help our device partners certify their products as IoT Plug and Play compatible, we have revamped and streamlined the Azure Certified for IoT program by launching a new portal and submission process. With the Azure Certified for IoT portal, device partners can define new products to be listed in the Azure Certified for IoT device catalog and specify product details such as physical dimensions, description, and geo availability. Device partners can manage their IoT Plug and Play models in their company model repository, which limits access to only their own employees and select partners, as well as the public model repository. The portal also allows device partners to certify their products by submitting to an automated validation process that verifies correct implementation of the Digital Twin definition language and required interfaces implementation.

An image of the device page for the MXChip-Certified.

Device partners will also benefit from investments in developer tooling to support IoT Plug and Play. The Azure IoT Device Workbench extension for VS Code adds IntelliSense for easy authoring of IoT Play and Play device models. It also enables code generation to create C device code that implements the IoT Plug and Play model and provides the logic to connect to IoT Central, without customers having to worry about provisioning or integration with IoT Device SDKs.

The new tolling capabilities also integrates with the model repository service for seamless publishing of device models. In addition to the Azure IoT Device Workbench, device developers can use tools like the Azure IoT explorer and the Azure IoT extension for Azure Command-line Interface. Device code can be developed with the Azure IoT SDK for C and for Node.js.

An image of the Azure IoT explorer.

Connect sensors on Windows and Linux gateways to Azure

If you are using a Windows or Linux gateway device and you have sensors that are already connected to the gateway, then you can make these sensors available to Azure by simply editing a JSON configuration. We call this technology the IoT Plug and Play bridge. The bridge allows sensors on Windows and Linux to just work with Azure by bridging these sensors from the IoT gateway to IoT Central or IoT Hub. On the IoT gateway device, the sensor bridge leverages OS APIs and OS plug and play capabilities to connect to downstream sensors and uses the IoT Plug and Play APIs to communicate with IoT Central and IoT Hub on Azure. A solution builder can easily select from sensors enumerated on the IoT device and register them in IoT Central or IoT Hub. Once available in Azure, the sensors can be remotely accessed and managed. We have native support for Modbus and a simple serial protocol for managing and obtaining sensor data from MCUs or embedded devices and we are continuing to add native support for other protocols like MQTT. On Windows, we also support cameras, and general device health monitoring for any device the OS can recognize (such as USB peripherals). You can extend the bridge with your own adapters to talk to other types of devices (such as I2C/SPI), and we are working on adding support for more sensors and protocols (such as HID).

Next steps

Plan migration of your Hyper-V servers using Azure Migrate Server Assessment

$
0
0

Azure Migrate is focused on streamlining your migration journey to Azure. We recently announced the evolution of Azure Migrate, which provides a streamlined, comprehensive portfolio of Microsoft and partner tools to meet migration needs, all in one place. An important capability included in this release is upgrades to Server Assessment for at-scale assessments of VMware and Hyper-V virtual machines (VMs.)

This is the first in a series of blogs about the new capabilities in Azure Migrate. In this post, I will talk about capabilities in Server Assessment that help you plan for migration of Hyper-V servers. This capability is now generally available as part of the Server Assessment feature of Azure Migrate. After assessing your servers for migration, you can migrate your servers using Microsoft’s Server Migration solution available on Azure Migrate. You can get started right away by creating an Azure Migrate project.

Server Assessment earlier supported assessment of VMware VMs for migration to Azure. We’ve now included Azure suitability analysis, migration cost planning, performance-based rightsizing, and application dependency analysis for Hyper-V VMs. You can now plan at-scale, assessing up to 35,000 Hyper-V servers in one Azure Migrate project. If you use VMware as well, you can discover and assess both Hyper-V and VMware servers in the same Azure Migrate project. You can create groups of servers, assess by group, and refine the groups further using application dependency information.

An image of the Overview page or an Azure Migrate assessment.

Azure suitability analysis

The assessment determines whether a given server can be migrated as-is to Azure. Azure support is checked for each server discovered. If it is found that a server is not ready to be migrated, remediation guidance is automatically provided. You can customize your assessment and regenerate the assessment reports. You can apply subscription offers and reserved instance pricing on the cost estimates. You can also generate a cost estimate by choosing a VM series of your choice, and specify the uptime of the workloads you will run in Azure.

Cost estimation and sizing

Assessment reports provide detailed cost estimates. You can optimize on cost using performance-based rightsizing assessments. The performance data of your on-premise server is taken into consideration to recommend an appropriate Azure VM and disk SKU. This helps to optimize and right-size on cost as you migrate servers that might be over-provisioned in your on-premise data center.

An image of the Azure readiness section of an Azure Migrate assessment.

Dependency analysis

Once you have established cost estimates and migration readiness, you can go ahead and plan your migration phases. Use the dependency analysis feature to understand the dependencies between your applications. This is helpful to understand which workloads are interdependent and need to be migrated together, ensuring you do not leave critical elements behind on-premises. You can visualize the dependencies in a map or extract the dependency data in a tabular format. You can divide your servers into groups and refine the groups for migration using this feature.

Assess your Hyper-V servers in three simple steps:

  • Create an Azure Migrate project and add the Server Assessment solution to the project.
  • Set up the Azure Migrate appliance and start discovery of your Hyper-V virtual machines. To set up discovery, the Hyper-V host or cluster names are required. Each appliance supports discovery of 5,000 VMs from up to 300 Hyper-V hosts. You can set up more than one appliance if required.
  • Once you have successfully set up discovery, create assessments and review the assessment reports.
  • Use the application dependency analysis features to create and refine server groups to phase your migration.

Note that the inventory metadata gathered is persisted in the geography you select while creating the project. You can select a geography of your choice. Server Assessment is available today in Asia Pacific, Australia, Azure Government, Canada, Europe, India, Japan, United Kingdom, and United States geographies.

When you are ready to migrate the servers to Azure, you can use Server Migration to carry out the migration. You will be able automatically carry over the assessment recommendations from Server Assessment into Server Migration. You can read more in our documentation “Migrate Hyper-V VMs to Azure.”

In the coming months, we will add assessment capabilities for physical servers. You will also be able to run a quick assessment by adding inventory information using a CSV file. Stay tuned!

In the upcoming blogs, we will talk about tools for scale assessments, scale migrations, and the partner integrations available in Azure Migrate.

Resources to get started

Preview of custom content in Azure Policy guest configuration

$
0
0

Today we are announcing a preview of a new feature of Azure Policy. The guest configuration capability, which audits settings inside Linux and Windows virtual machines (VMs), is now ready for customers to author and publish custom content.

The guest configuration platform has been generally available for built-in content provided by Microsoft. Customers are using this platform to audit common scenarios such as who has access to their servers, what applications are installed, if certificates are up to date, and whether servers can connect to network locations.

An image of the Definitions page in Azure Policy.

Starting today, customers can use new tooling published to the PowerShell Gallery to author, test, and publish their own content packages both from their developer workstation and from CI/CD platforms such as Azure DevOps.

For example, if you are running an application on an Azure virtual machine that was developed by your organization, you can audit the configuration of that application in Azure and be notified when one of the VMs in your fleet is not compliant.

This is also an important milestone for compliance teams who need to audit configuration baselines. There is already a built-in policy to audit Windows machines using Microsoft’s recommended security configuration baseline.  Custom content expands the scenario to content from a popular source of configuration details, group policy. There is tooling available to convert from group policy format to the desired state configuration syntax used by Azure Policy guest configuration. Group policy is a common format used by organizations that publish regulatory standards, and a popular tool for enterprise organizations to manage servers in private datacenters.

Finally, customers that are publishing custom content packages can include third party tooling. Many customers have existing tools used for performing audits of settings inside virtual machines before they are released to production. As an example, the gcInSpec module is published as an open source project with maintainers from Microsoft and Chef. Customers can include this module in their content package to audit Windows virtual machines using their existing investment in Chef InSpec.

For more information, and to get started using custom content in Azure Policy guest configuration see the documentation page ”How to create Guest Configuration policies.”

Build and Debug MySQL on Linux with Visual Studio 2019

$
0
0

The MySQL Server Team recently shared on their blog how to use Visual Studio 2019 to edit, build, and debug MySQL on a remote Linux server. This leverages Visual Studio’s native support for CMake and allows them to use Visual Studio as a front-end while outsourcing all the “heavy lifting” (compilation, linking, running) to a remote Linux machine.  

MySQL Server logo

“I’ve recently found myself using Microsoft Visual Studio on my laptop as my ‘daily driver.’ I have a history with VS. But I also really like how the product is developing as of late. The pace of innovation is great and the team behind it extremely responsive. Thus individual users like me are feeling increasingly ‘in control’ and that drives loyalty up.”  


Thank you Georgi for using Visual Studio and for the kind words. Our team looks forward to continuing to improve the product based on feedback we receive from the community. Check out the full story from the MySQL Server Team (+ step-by-step instructions for getting started) on the MySQL Server Blog!  

The post Build and Debug MySQL on Linux with Visual Studio 2019 appeared first on C++ Team Blog.

Viewing all 5264 articles
Browse latest View live


<script src="https://jsc.adskeeper.com/r/s/rssing.com.1596347.js" async> </script>